Categories
Knowledge Support Support Categories Products exacqVision Hardware

Replacing a Hard Drive on Q-Series 2024 Refresh

  1. Looking at the rear of the system, remove the three screws indicated in the illustration below.
  1. Looking at the rear end of the top cover, remove the two screws indicated below.
  1. Slide the top cover towards the rear and pull off to remove it from the chassis.
  2. Remove the three screws indicated below.
  1. Remove the front bezel by lightly lifting the tabs indicated and rotating the top of the bezel away from the chassis.
  1. With the front bezel removed, looking at the front of the system, remove the two screws in the upper corners as indicated in the image below.
  1. Lift the drive plate to separate it from the chassis. Remove the hard drive retaining screws shown in the image below, supporting the drive from underneath.
  1. Detach the SATA power and data cables from the hard drive and attach to the replacement drive. Reverse the steps above to reassemble the system.
  1. When reattaching the drive plate, fit the three tabs on the front of the plate into the slots as shown.

<br>

Categories
Knowledge Support exacqVision Server Products Uncategorized

False Drive Offline status on some Q-series models

Description 

Some drives may show an “offline” status on the hardware tab in ExacqVision Client when Server Version 23.03.1.0 is installed on Q-series models, though data can be read from and written to the drive.

Note: This issue manifests itself cosmetically by appearing as if the drive is offline but has no bearing on functionality for video searching.

Product 

ExacqVision Server Version 23.03.1.0

Steps to Reproduce 

Update to Server Version 23.03.1.0 from a previous server software version.

Expected Results

Drives should populate hardware tab with a healthy status.

Actual Results 

One or more drives may appear as “Offline” on the hardware tab.

Solution

Update to ExacqVision Server 23.03.2.0 if SSA is current and up to date, or alternatively rollback to ExacqVision Server 20.12.8.0 as a workaround.

AES-457


Categories
Video Library Configuration exacqVision Client exacqVision Server Youtube Video Library Categories Products

Storage

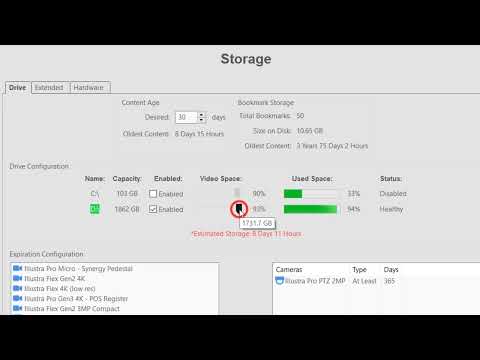
This video will introduce you to the controls available on the Storage page, which allow you to monitor the health and control which drives are written to. Gain an informed understanding of the Expiration Configuration settings and the retained amount of data stored on your system. Use the Extended tab to optionally connect to a networked iSCSI storage device to expand your total amount of recording capacity.
Categories
Knowledge Support Support exacqVision Server Categories Uncategorized

Replacing the First Storage Drive using GParted on a Non-RAID exacqVision Ubuntu Linux Server having an 8 GB or smaller ROOT partition

Description

•This procedure applies to replacing the first non-RAID storage drive (mechanical SATA hard disk drive) on an Ubuntu Linux-based exacqVision server. If the operating system ROOT partition is 8GB or smaller, the replacement primary storage drive will need to have the “Linux swap”, “export”, and first “storage” partitions created on it.
•These instructions assume that the Linux operating system is installed to an on-board solid-state drive (SSD) and can be successfully logged into with an administrator account.
•This procedure is not intended for simply adding a new storage drive to a fully functional system.

Product

exacqVision Ubuntu Linux non-RAID Servers

Solution:

A. Verifying the size of the Root partition is 8 GB or smaller

The root partition size will need to be verified before completing the replacement task properly. Open Terminal and specify the command: df -h

Filesystem      Size  Used Avail Use% Mounted on
udev            1.7G     0  1.7G   0% /dev
tmpfs           339M  4.1M  335M   2% /run
/dev/sda3        55G  9.9G   43G  19% /
tmpfs           1.7G     0  1.7G   0% /dev/shm
tmpfs           5.0M  4.0K  5.0M   1% /run/lock
tmpfs           1.7G     0  1.7G   0% /sys/fs/cgroup
/dev/sda2        17G  1.6G   15G  10% /home
/dev/sda4        28G  421M   26G   2% /mnt/export
/dev/sda1        12G  3.1G  8.2G  27% /boot/efi
tmpfs           339M   20K  339M   1% /run/user/1000

In this example, the root directory “/” is located on the “/dev/sda3 partition which has a size of “55 GB.”
If the root partition is 8 GB or less, continue with this document.

If, however, the root partition is 20 GB or greater, please obtain Support Portal Knowledge Base Number 10048 – “Replacing the First Storage Drive using GParted on a Non-RAID exacqVision Ubuntu Linux Server having a 20 GB or larger ROOT partition.”

B. Temporarily Disabling the Original Drive Mount Point Listed in the fstab File

  1. Type the command sudo gedit /etc/fstab in Terminal and press the enter key to edit the file.

# /etc/fstab: static file system information.
#
# Use ‘blkid’ to print the universally unique identifier for a
# device; this may be used with UUID= as a more robust way to name devices
# that works even if disks are added and removed. See fstab(5).
#
# <file system> <mount point>   <type>  <options>       <dump>  <pass>
# / was on /dev/sda3 during installation
UUID=36a8d968-7e63-4859-a91b-0fdfcc319d3a /               ext4    errors=remount-ro 0       1
# /boot/efi was on /dev/sda1 during installation
UUID=DDF2-8CC6  /boot/efi       vfat    umask=0077      0       1
# /home was on /dev/sda2 during installation
UUID=bc7b3ed7-7dfd-4530-972a-9c3269ea624b /home           ext4    defaults        0       2
# /mnt/export was on /dev/sda4 during installation
UUID=e4638d65-fbe8-407c-a9e8-6c3da0bed19c /mnt/export     ext4    defaults        0       2
/swapfile                                 none            swap    sw              0       0
LABEL=/mnt/edvr/1   /mnt/edvr/1   ext4   relatime,errors=remount-ro,noauto,x-systemd.automount    0   0

2. Locate and add a “” remark character and a space to the beginning of the line for “/mnt/edvr/1”. Save the file.

# LABEL=/mnt/edvr/1   /mnt/edvr/1   ext4   relatime,errors=remount-ro,noauto,x-systemd.automount    0   0 

3. Type the command sudo reboot in Terminal to restart the exacqVision Server.

C. Partitioning the First Non-RAID Storage Drive using GParted

  1. Open a Terminal session.  Type the command sudo gparted and press the enter key. If prompted for a password, use the admin account password.
  2. Select the empty hard drive from the drop-down list in the top-right corner. Note that the drive is unallocated, which indicates that you have selected the correct hard drive. Select Create Partition Table from the Device menu.

​​​​​​​3. Select Advanced in the Create Partition Table dialog. Select gpt from the Select New Partition Table Type drop-down list. Click Apply.

​​​​​​​4. Right-click in the unallocated space and select New to open the Create New Partition window. Select 20000 in the New Size (MiB) box. Select linux-swap in the File System drop-down list. In the Label field, type swap. Click Add.

5. Right-click the unallocated space and select New to open the Create New Partition window. Select 10000 in the New Size (MiB) box. Select ext4 in the File System drop-down list. In the Label field, type /mnt/export. Click Add.

6. Right-click the unallocated space and select New to open the Create New Partition window. Select the highest available number in the Set New Size (MiB) box. Make sure Free Space Preceding and Free Space Following are both zero or 1. Select ext4 in the File System drop-down list. In the Label field, type /mnt/edvr/1. Click Add.

​​​​​​​7. Click the green checkmark at the top of the screen and then click Apply. Wait for the operations to complete. Click on the Close button.

8. Close GParted.
9. In the terminal window, enter the following commands.

sudo service edvrserver stop
sudo mount –a

10. To create your export directories and change ownership:

sudo mkdir /mnt/export/admin
sudo mkdir /mnt/export/user
sudo chown admin /mnt/export/admin
sudo chown user /mnt/export/user
sudo service edvrserver start

11. In a Terminal window, enter the following commands:

sudo rm -r /home/admin/exacqVision\ Files
sudo rm -r /home/user/exacqVision\ Files
sudo ln -s /mnt/export/admin /home/admin/exacqVision\ Files
sudo ln -s /mnt/export/user /home/user/exacqVision\ Files

12. Run exacqVision Client and check the Storage configuration. You should see the new drive in the list of attached storage devices.

13. Type the command sudo gedit /etc/fstab in Terminal and press the enter key to edit the file.

# LABEL=/mnt/edvr/1   /mnt/edvr/1   ext4   relatime,errors=remount-ro,noauto,x-systemd.automount    0   0

  1. Locate and remove the “#” and space at the beginning of the line for “/mnt/edvr/1”. Save the file and closed the text editor.

LABEL=/mnt/edvr/1   /mnt/edvr/1   ext4   relatime,errors=remount-ro,noauto,x-systemd.automount    0   0

  1. Type the command sudo reboot in Terminal to restart the exacqVision Server. If prompted for a password, use the admin account password (admin256 by default).

D. The replaced drive may display as “Offline” in the Storage Page

  1. (A) If the old drive DOES NOT display as “Offline” in the Storage Page then the procedure is considered complete.  (B) If the old drive DOES display as “Offline” then continue below.
  2. Run exacqVision Client and check the Storage configuration. You should see the new drive in the list of attached storage devices.  The replaced drive displays as “Offline” which requires editing the <sysmgmtpi.xml> file located in the path: /usr/local/exacq/server to remove the corresponding entries. Click on the “Offline” disk and note the model number and serial number for this purpose. Close the exacqVision Client.
  1. Open a Terminal session. Type the command sudo service edvrserver stop and press the enter key to stop the server service.
  2. Type the command cd /usr/local/exacq/server/ and press the enter key.
  3. Type the command sudo cp -via sysmgmtpi.xml sysmgmtpi.bak and press the enter key to back-up the original file.
  4. Type the command sudo gedit sysmgmtpi.xml and press the enter key. Scroll down and remove the lines (between and including the xml tags < Disk Name = > and < / Disk >) for the corresponding “Offline” hard disk drive model number and serial number noted previously with exacqVision Client.  It should lack any < Attribute > tags.

The section to be removed in our example:
< Disk Name = “WD-WCC4M4VYN3E5” Model=”WDC WD20PURZ-85GU6Y0″ SerialNumber=”WD-WCC4M4VYN3E5″ FirmwareVersion=”” DriverVersion=”” Capacity=”-1″ SmartAvailable=”-1″ SmartEnabled=”-1″ ControllerName=”” UnitName=”” OtherName=”” Speed=”-1″ LinkSpeed=”-1.000000″ Hotspare=”0″ CanConfigureHotSpare=”0″ Attached=”0″ NonRaidPort=”2″ SupportsPrep=”0″>
  < Thresholds >
    < Threshold Id = “194” Min=”5″ Max=”55″ />
  < /Thresholds >
< /Disk >

  1. Save” the changes and “Close” the gedit window.
  2. Type the command sudo service edvrserver start and press the enter key to start the server service.
  3. Close the Terminal window.
  4. Run exacqVision Client and check the Storage configuration is free of the “Offline” hard disk drive entry.
  1. Done.

<br>

Categories
Knowledge Support Support exacqVision Server Categories Products Uncategorized

Replacing the First Storage Drive using GParted on a Non-RAID exacqVision Ubuntu Linux Server having a 20 GB or larger ROOT partition

Description 

•This procedure applies to replacing the first non-RAID storage drive (mechanical SATA hard disk drive) on an Ubuntu Linux-based exacqVision server.  If the operating system ROOT partition is 20GB or larger, the replacement storage drive will only need to have the first “storage” partition created on it.
•These instructions assume that the Linux operating system is installed to an on-board solid-state drive (SSD) and can be successfully logged into with an administrator account.
•This procedure is not intended for simply adding a new storage drive to a fully functional system.

Product

exacqVision Ubuntu Linux non-RAID Servers

Solution:

A. Verifying the size of the Root partition is 20 GB or larger

The root partition size will need to be verified to complete the replacement task properly. Open Terminal and specify the command: df -h

Filesystem      Size  Used Avail Use% Mounted on
udev            1.7G     0  1.7G   0% /dev
tmpfs           339M  4.1M  335M   2% /run
/dev/sda3        55G  9.9G   43G  19% /
tmpfs           1.7G     0  1.7G   0% /dev/shm
tmpfs           5.0M  4.0K  5.0M   1% /run/lock
tmpfs           1.7G     0  1.7G   0% /sys/fs/cgroup
/dev/sda2        17G  1.6G   15G  10% /home
/dev/sda4        28G  421M   26G   2% /mnt/export
/dev/sda1        12G  3.1G  8.2G  27% /boot/efi
tmpfs           339M   20K  339M   1% /run/user/1000

In this example, the root directory “/” is located on the “/dev/sda3 partition which has a size of “55 GB.”
If the root partition is 20 GB or larger, continue with this document.
If, however, the root partition is 8 GB or smaller, please obtain Support Portal Knowledge Base Number 10050 – “Replacing the First Storage Drive using GParted on a Non-RAID exacqVision Ubuntu Linux Server having an 8 GB or smaller ROOT partition“.

B. Temporarily Disabling the Original Drive Mount Point Listed in the fstab File

  1. Type the command sudo gedit /etc/fstab in Terminal and press the enter key to edit the file.

# /etc/fstab: static file system information.
#
# Use ‘blkid’ to print the universally unique identifier for a
# device; this may be used with UUID= as a more robust way to name devices
# that works even if disks are added and removed. See fstab(5).
#
# <file system> <mount point>   <type>  <options>       <dump>  <pass>
# / was on /dev/sda3 during installation
UUID=36a8d968-7e63-4859-a91b-0fdfcc319d3a /               ext4    errors=remount-ro 0       1
# /boot/efi was on /dev/sda1 during installation
UUID=DDF2-8CC6  /boot/efi       vfat    umask=0077      0       1
# /home was on /dev/sda2 during installation
UUID=bc7b3ed7-7dfd-4530-972a-9c3269ea624b /home           ext4    defaults        0       2
# /mnt/export was on /dev/sda4 during installation
UUID=e4638d65-fbe8-407c-a9e8-6c3da0bed19c /mnt/export     ext4    defaults        0       2
/swapfile                                 none            swap    sw              0       0
LABEL=/mnt/edvr/1   /mnt/edvr/1   ext4   relatime,errors=remount-ro,noauto,x-systemd.automount    0   0

2. Locate and add a “” remark character and a space to the beginning of the line for “/mnt/edvr/1”. Save the file and closed the text editor.

# LABEL=/mnt/edvr/1   /mnt/edvr/1   ext4   relatime,errors=remount-ro,noauto,x-systemd.automount    0   0 

3. Type the command sudo reboot in Terminal to restart the exacqVision Server. If prompted for a password, use the admin account password (admin256 by default). 

C. Partitioning the First Non-RAID Storage Drive using GParted

  1. Open a Terminal session.  Type the command sudo gparted and press the enter key. If prompted for a password, use the admin account password.
  2. Select the empty hard drive from the drop-down list in the top-right corner.  Note that the drive is unallocated, which indicates that you have selected the newly installed hard disk drive. Select Create Partition Table from the Device menu.
  3. In the Create Partition Table dialog, select gpt from the “Select New Partition Table Type” drop-down list. Click Apply
  1. Right-click the unallocated space and select New to open the Create New Partition window. Select the highest available number in the New Size (MiB) box. Make sure Free Space Preceding and Free Space Following are both at the minimum value allowed (zero or 1). Select “ext4” in the File System drop-down list. In the Label field, type “/mnt/edvr/1”. Click the “Add” button. Click the green checkmark icon near the top of the screen.
  1. Click on “Apply” and wait for the operations to complete. Click on the Close button. Close Gparted.
  2. Type the command sudo gedit /etc/fstab in Terminal and press the enter key to edit the file.

# LABEL=/mnt/edvr/1   /mnt/edvr/1   ext4   relatime,errors=remount-ro,noauto,x-systemd.automount    0   0

  1. Locate and remove the “#” and space at the beginning of the line for “/mnt/edvr/1”. Save the file and closed the text editor.

LABEL=/mnt/edvr/1   /mnt/edvr/1   ext4   relatime,errors=remount-ro,noauto,x-systemd.automount    0   0

  1. Type the command sudo reboot in Terminal to restart the exacqVision Server. If prompted for a password, use the admin account password (admin256 by default).

D. The replaced drive may display as “Offline” in the Storage Page

  1. (A) If the old drive DOES NOT display as “Offline” in the Storage Page then the procedure is considered complete.  (B) If the old drive DOES display as “Offline” then continue below.
  2. Run exacqVision Client and check the Storage configuration. You should see the new drive in the list of attached storage devices.  The replaced drive displays as “Offline” which requires editing the < sysmgmtpi.xml > file located in the path: /usr/local/exacq/server to remove the corresponding entries. Click on the “Offline” disk and note the model number and serial number for this purpose. Close the exacqVision Client.
  1. Open a Terminal session. Type the command sudo service edvrserver stop and press the enter key to stop the server service.
  2. Type the command cd /usr/local/exacq/server/ and press the enter key.
  3. Type the command sudo cp -via sysmgmtpi.xml sysmgmtpi.bak and press the enter key to back-up the original file.
  4. Type the command sudo gedit sysmgmtpi.xml and press the enter key. Scroll down and remove the lines (between and including the xml tags < Disk Name = > and < /Disk >) for the corresponding “Offline” hard disk drive model number and serial number noted previously with exacqVision Client.  It should lack any < Attribute > tags.

The section to be removed in our example:
< Disk Name = “WD-WCC4M4VYN3E5” Model=”WDC WD20PURZ-85GU6Y0″ SerialNumber=”WD-WCC4M4VYN3E5″ FirmwareVersion=”” DriverVersion=”” Capacity=”-1″ SmartAvailable=”-1″ SmartEnabled=”-1″ ControllerName=”” UnitName=”” OtherName=”” Speed=”-1″ LinkSpeed=”-1.000000″ Hotspare=”0″ CanConfigureHotSpare=”0″ Attached=”0″ NonRaidPort=”2″ SupportsPrep=”0″>
  < Thresholds >
    < Threshold Id = “194” Min=”5″ Max=”55″ />
  < /Thresholds >
< /Disk >

  1. Save” the changes and “Close” the gedit window.
  2. Type the command sudo service edvrserver start and press the enter key to start the server service.
  3. Close the Terminal window.
  4. Run exacqVision Client and check the Storage configuration is free of the “Offline” hard disk drive entry.
  1. Done.

<br>

Categories
Knowledge Support Support Categories Products exacqVision Hardware

Scansource Hardware Modifications

Scansource received approval and instructions from the Exacq Engineering team to modify hardware by adding hard drives to existing systems. Since our Tech Support team may need to be aware of the changes, a Sharepoint page with all of the instructions and a spreadsheet with each system that has been modified can be accessed HERE.

Categories
Video Library Demo Categories Products exacqVision Hardware

2021-02 – Hard Drive Issues Training

Hard Drive Issues Troubleshooting

Categories
Knowledge Support Support exacqVision Server Categories Products

Hard Drive Self-Test Broken On Older Linux Systems with 9.2

Symptom:

When clicking the ‘Self-Test’ button for hard drives, nothing happens.

<br>

Problem:

Introduced in exacqVision Server 9.2.1, a code change broke the self-test functionality for older Linux systems that do not have Smartctl installed. 

Smartctl is not listed in the ‘Version Information’ panel on the ‘System Information’ page of the client. 

<br>

Solution:

Option 1:  If license subscription allows, update the exacqVision Server version to 9.4 or higher. 

Option 2:  If license subscription does not allow update, either downgrade to sever version 9.0, or install Smartctl by running the following command in Terminal:   

sudo apt-get install smartctl 

<br>

Hard-Drive-Self-Test-Broken-On-Older-Linux-Systems-with-9.2-2.pdf
Categories
Knowledge Support Support exacqVision Server Categories Products

Server May Indicate False HD Temperature Alarms on Systems with LSI RAID

Symptom

Client displays temperature alarms on hard drives. 

These may indicate temperatures near 1° C, or between ~20000-30000° C. 

<br>

Problem

This behavior was seen from the following Western Digital HD models when connected to LSI storage controllers.

  • WD4002FYYZ
  • WD8002FRYZ
  • WD8003FRYZ
  • WD6002FRYZ
  • WD80PUZX
  • WD101KRYZ
  • WD121KRYZ

<br>

Solution

Update the ExacqVision Server version to 9.3.9 or higher, also back-patched into 9.2 RC. 

<br>

Categories
Knowledge Support Support Categories Products exacqVision Hardware

Hard Drive Power on exacqVision EL-SR and EL-IP Systems
EL-SR and EL-ip exacqVision systems were manufactured with hard-drive caddies that contain a power switch starting in October 2011. If it appears that the hard drive in an exacqVision EL-SR or EL-ip system is not functioning even though the system is powered up, look on the front of the system and determine whether a hard drive power button is visible (see the button circled in red in the photograph below). If the green hard drive LED is not illuminated (see green circle), push the button to activate the hard drive.

<br>

Hard-Drive-Power-on-exacqVision-EL-SR-and-EL-ip-Systems.pdf