Categories
User Guides Video Library Demo exacqVision Client Youtube Video Library Categories Products

Export and Burn to Disc

Learn how to export your video clips and burn them to disc.
Categories
Knowledge Support Documentation Support exacqVision Client Categories Products

How to Use Debug View with PS files

Description 

DebugView is a tool that can be used to collect more data from PS files in cases where we are missing data from streams or exhibiting issues with exported files.

<br>

Product 

DebugView can be found at:
https://learn.microsoft.com/en-us/sysinternals/downloads/debugview

<br>

Steps to Use DebugView 

Once you have exported the PS file from a server you can download the DebugView application and open the program.
With Debug View opened, perform the following steps:

  1. Run CMD on a Windows machine using Run as Administrator<br><br>
  2. Change your working directory to the directory where the PS file is located, using the ‘cd’ command.
    Example:
    In this example the file is located on the Desktop

    cd C:\Users\username\Desktop<br><br>
  3. Run the file by entering the file name, and add the ‘-V’ parameter to the end. If located in a different directory, enter the file path.
    Example:
    In this example the file name is ‘3505-001A0280.ps’

    3505-001A0280.ps -V
    or
    C:\Users\username\Desktop\3505-001A0280.ps -V<br><br>
  4. When the Exacq ePlayer opens, press the play button.<br><br>
  5. DebugView will log activity during playback. Save the file as soon as the clip has finished playback to avoid logging your mouse and keyboard activity.

In this Example- We have an issue where the data that was recorded is not viewable when searching, exporting the video.
This tells us that the cameras were getting some of the stream information but not all of the stream information that is vital to play back the video that was recorded.
This might suggest that the camera was in a bad state, low power mode or there was something taking place.

<br>

Categories
Knowledge Support Support exacqVision Client Categories Products

Video Codecs vs Video Containers

Codecs

Codec is a term that combines compression and decompression. Transmitting video streams or storing video files in a compressed format to save bandwidth and storage capacity requires one algorithm to compress the video and another to decompress it at the system receiving the stream or playing the file.

Containers

Containers are just that, a container sort of like a shipping box, that holds all the pieces of your file together so that when you want to play back a file, everything needed is there. An example might be including subtitles or metadata with your video. Some container types are capable of this while others are not, which may influence the type you choose. This is illustrated in the article ExacqVision Export Video File Types

<br>

Categories
Knowledge Support Support exacqVision Server Categories Products

CD/DVD Recorders and Disc Types

Many users have moved to transporting files via portable USB devices or cloud services. CD/DVDs are still often desired by those working with legal evidence or those in insurance and law enforcement due to their low cost and ability to be mailed or stored in flat file folders. Users with systems that do not have on-board DVD drives, or users with third-party hardware, can still utilize external DVD drives to record exported video files if needed. Article 2678 explains this. The following article provides additional information regarding drive types and media use.

When examining optical disc drives as well as the CD or DVD media used in them you will note the presence, or lack of, + and – symbols as well as various acronyms used.

Disc Formats and Capacities

The initial two or three letters inform you about the disc format.

  • CD (Compact Disc) is the older of the formats and has a capacity of around 700 MB. Originally created for music, but can be used to store data or video files if used with a compatible reader.
  • DVD (Digital Video Disc) created to provide increased capacity for video, these discs typically hold around 4.7 GB.
  • BD (Blu-Ray) created to provide even more capacity for high-definition video that requires more space, these typically store up to 25 GB.

A caveat to the capacities listed above, are DL discs, these are mentioned below with the additional acronyms.

Disc Standards (+/-)

There are two standards used for recordable DVDs, indicated by + and – symbols. DVD-R is and older format that was improved upon by DVD+R. The two formats hold similar amounts of data but the DVD+R standard provides some error checking during recording resulting in fewer opportunities for write errors.

You will only see the ± symbol on drives, not on discs, and this tells you that the drive can burn to both + and – discs. This was more important in the past, as many drives today are ±, though this should be noted if you are experiencing issues burning discs since older DVD+R and DVD+RW drives were unable to record to DVD-R and DVD-RW media and vice versa.

Disc Capabilities

The acronyms following the + or – inform you what the disc is capable of, as follows:

  • ROM (Read-Only Memory), as the name implies these are read-only and come from a production facility with the data already on them. Many users simply drop the ROM altogether and refer to these as simply, CDs, DVDs, or Blu-rays.
  • R (Recordable) indicates that the disc is recordable a single time. Once written to, it cannot be recorded to again.
  • RW (Rewritable). In a compatible drive, these discs can be written to more than once.
  • RE (Recordable Erasable), this is essentially the same as RW but used for rewritable Blu-ray discs.
  • DL (Dual Layer), usually appearing last, you may note some discs that display DL, which stands for Dual Layer. These discs will hold twice as much data, DVDs 8.5 GB and BDs 50 GB. Note, however that dual layer DVDs are NOT the same as double-sided DVDs that are flipped over to record on both sides of the disc.

Disc and Drive Compatibilities

The chart below aligns the drive type along the left-hand side with the optical media type listed across the top.

Drive Type Disc Type
CD-R CD-RW DVD-R DVD-RW DVD+R DVD+RW DVD+R DL BD-R BD-RE BD-R DL
CD-ROM Read Read
CD-R Read/Write Read
CD-RW Read/Write Read/Write
DVD-ROM Read Read Read Read Read Read Read
DVD-R Read/Write Read/Write Read/Write Read Read Read Read
DVD-RW Read/Write Read/Write Read/Write Read/Write Read Read Read
DVD+R Read/Write Read/Write Read Read Read/Write Read Read
DVD+RW Read/Write Read/Write Read Read Read/Write Read/Write Read
DVD+R DL Read/Write Read/Write Read Read Read/Write Read/Write Read/Write
BD-ROM Read Read Read Read Read Read Read Read Read Read
BD-R Read/Write Read/Write Read/Write Read/Write Read/Write Read/Write Read/Write Read/Write Read Read
BD-RE Read/Write Read/Write Read/Write Read/Write Read/Write Read/Write Read/Write Read/Write Read/Write Read
BD-R DL Read/Write Read/Write Read/Write Read/Write Read/Write Read/Write Read/Write Read/Write Read/Write Read/Write

<br>

Troubleshooting

If experiencing problems burning discs, as mentioned above, be sure that the optical media being used is compatible with the drive being used.

Check that any external and/or third-party drives are recognized by the system and have any necessary drivers installed.

Article 2619 discusses the quality of the media.

<br>

Categories
Knowledge Support Support exacqVision Client Categories Products

How To Crop Exported Video for Privacy

Support for cropping exported video was added in ExacqVision Desktop Client 7.8. The following steps require Client 7.8 or higher.


If video is exported that contains some relevant content but also contains content that should not be distributed due to privacy concerns, it is possible to crop the exported video to specific dimensions that will exclude non-relevant parts of the scene.

Steps:

  1. Perform a search for the camera(s) and time range you wish to export.
  2. Place the yellow timeline cursor at the beginning and end points of your desired exported time range. Use the Mark Start/Stop buttons on the timeline toolbar, or right-click on the timeline and select Mark Start/Stop.
  1. Select the Crop button from the timeline toolbar, or right-click the timeline and select Enable Crop.
  1. The image above the timeline will display a blue overlay. Click-and-drag to highlight only the region you wish to crop the export to. Only the blue-tinted region will be exported.
  2. When you are satisfied with the region you’ve selected, click the Download and Export Video button from the timeline toolbar, or right-click the timeline and select Download and Export Video.
  3. The dialog window that appears will allow you to enter a filename of your choice and select the exported file type.

<br>

Categories
Video Library Configuration exacqVision Client Categories Products

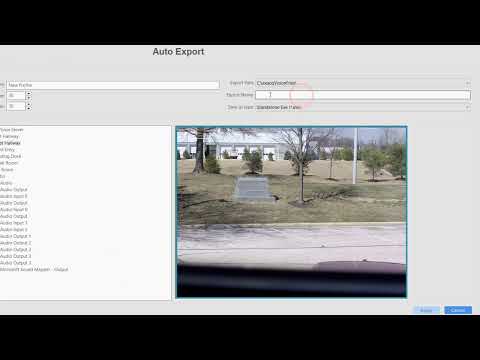
Auto Export

Configuring your Auto Export settings allows you to create profiles which can be utilized by Event Linking to trigger automated file exports, or burning CD/DVDs, on your chosen activity, such as a trigger input, a serial data keyword, access control event, and more.
Categories
Video Library Configuration exacqVision Client Categories Products

Export File Types

Gain a deeper understanding of the benefits each of the many export file types available from ExacqVision provides you.

If an incident occurs and you need to share recordings with your management, a legal representative, law enforcement, or others… knowing which file type provides the protections or data needed, and that they can review is key.

Categories
Knowledge Support Support exacqVision Client

Multiple USB Folders Present When Exporting in exacqVision

Description

When exporting on a Linux based system to a USB key it has been observed that more than one folder for your device can be present. 

Product 

  • exacqVision Client

Steps to Reproduce 

  1. Insert a USB Key 
  2. Physically remove the USB Key 
  3. Insert the USB Key again 
  4. Search, mark and export video from within the exacqVision Client
  5. Navigate to the USB_KEY folder 

Expected Results 

  • A single folder labeled with the <name of your device> USB is available 

Actual Results 

  • Multiple folders labeled with the <name of your device> USB are available 

Solution

  • This has resulted because the USB key has been physically removed without first using the unmount USB device icon in the exacqVision Client.  
  • To proceed with the export simply choose the folder with the highest number. 
  • To clear the list of orphaned USB device folders requires a reboot

Note: If you have multiple USB device folders and choose the wrong one to export the data, you will encounter an error similar to the following.

Categories
Knowledge Support Support exacqVision Client exacqVision Server Categories Products

How to export a list of Server MACs and Licenses

For enterprise installations with many servers, a single .CSV file with all Server MAC addresses and license keys can be generated by ExacqVision. This file can be imported and applied to all the servers for bulk license updating or used for checking/ordering license changes and SSA extensions.

From Configuration mode, on the Systems page, click Export Licenses and browse to the location where you wish to save the .CSV file.

Updating the license keys in the .CSV file allows you to later upload the revised .CSV file, using Import License should you choose, to update the licenses on several servers at once.

<br>

Categories
Knowledge Support Support exacqVision Server Categories Products

Server Memory Leak From Auto Export

There is a small memory leak of 12.5M from each auto export instance, when exporting to EXE. 

Introduced in exacqVision Server 8.0, this has been fixed. Update to Server version 9.4 or later to resolve.