Categories
Knowledge Support Support exacqVision Client Products

Client Machine Suspect Tracking Button Stops Working

Description:
If navigating from one suspect tracking area to another we found that the button for that next camera is not sustaining. You have to click on the button from the associations again in order to select the next camera to navigate to.

Product:
Found on Server Version 22.12 and 23.03

Workaround:

  1. Close the Client
  2. Go into %appdata% and copy the edvrclient.xml file from the directory to the desktop for comparison later on.
  3. Delete the edvrclient.xml from the %appdata% folder.
  4. Relaunch the client and connect to the server.
    Relaunching the client will create a new edvrclient.xml that we will need to compare to the original one however you will need to connect to the server first.
  5. Navigate to %appdata% again and copy the newly created edvrcleint.xml to the desktop for support to compare.

    Note: We have only seen this issue 1 time and it might be related to installing the client on different user accounts for the OS Windows 10 and just a bad configuration.

    We did compare the edvrclient.xml’s and could not find anything that would suggest how this behavior started. If we see further issues based around the client machines having issues we should follow the steps here to gather the edvclient.xml’s and apply the work around to get the Suspect tracking working.
Categories
Video Library Configuration exacqVision Client exacqVision Server Youtube Video Library Categories Products

Camera Settings

Nested in the configuration tree, beneath Camera Recording, is the list of all cameras connected to the system. Clicking on any of these cameras will display the settings page for that individual camera. From here, you have access to important settings, such as the camera name, configuring the optional on-screen display (OSD), picture settings, motion settings, recording settings, recording schedule, as well as advanced features for PTZ and fisheye cameras or Suspect Tracking windows.

Categories
Knowledge Support Support exacqVision Client Categories Products

How to Configure Suspect Tracking

How to configure suspect tracking

Introduced in exacqVision 8.0, suspect tracking provides users with a visual method of following a person or object moving through several camera scenes.

Suspect tracking is featured as a new tab on the camera settings page. If you already have cameras laid out on a map that includes the camera you are configuring, you may opt to use the ‘Generate from Map’ button. This button will try its best to approximate placement of suspect tracking windows based on your map. You will probably still need to make some edits.

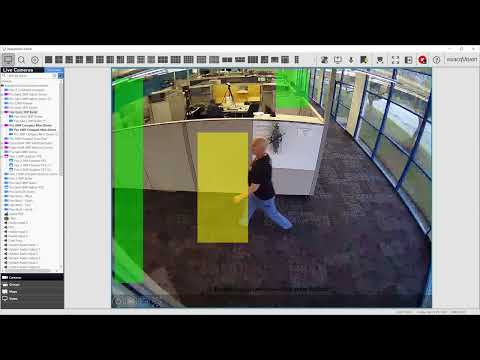
The suspect tracking ‘windows’ are drawn over the live camera image and act similar to a web page link, where clicking this window in Live Mode will automatically take you to the view of the associated camera.

Click on the New button to add a suspect tracking window.

Click and hold while you drag out a window over the camera image. Release to finish drawing the window. Even after drawing the window you can resize it and move it.

In the example above a window was placed to the left side because we have another camera down that hallway. You can change the fill color, border color and opacity for each window to make them stand out or easily identifiable for your users. Before you can click the Apply button you must select the ellipses button and choose the camera you want this window to be tied to.

When you are done editing your suspect tracking window, click Apply.

In Live mode a new camera association will appear.

Clicking or pressing this association toggles the suspect tracking windows on and off.

Double-clicking on the suspect tracking window will change that camera panel to the associated camera.

<br>

How-to-Configure-Suspect-Tracking.pdf