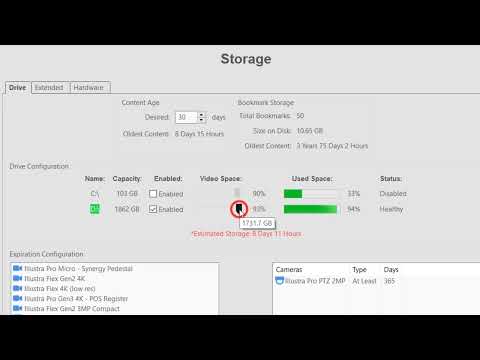
This video will introduce you to the controls available on the Storage page, which allow you to monitor the health and control which drives are written to.
Gain an informed understanding of the Expiration Configuration settings and the retained amount of data stored on your system.
Use the Extended tab to optionally connect to a networked iSCSI storage device to expand your total amount of recording capacity.
Expanding a MegaRAID Virtual Drives Capacity using LSA – Empty Slots Available
Description
Expanding a virtual drive means increasing its capacity. Existing data on the virtual drive is not impacted by the expansion. Follow these instructions to add a physical drive and expand the virtual disk size using LSI Storage Authority. Expanding a RAID volume by adding hard drives is only available with RAID 0, 1, 5, and 6 configurations. RAID volume expansion will not work with other RAID configurations, such as RAID 00, 10, 50, or 60.
NOTE: Capacity expansion is only possible on RAID 0, 1, 5 and 6. Please keep in mind, there should only be “1 virtual drive” on the array. If you have more than 1 virtual drive, then you cannot enlarge your array. You will have to create a backup, delete the array, create a new RAID, and restore your backup to the new virtual drive.
Caution: Physical drives with the same or larger capacity as the existing drives should be used. If the new drive has a larger capacity only the amount matching the current physical drives making up the Virtual drive will be used. For example, if the existing Virtual Drive consist of 4TB drives and a new 6TB drive is used to expand the Virtual Drive, the capacity of the new drive will be reported at 4TB, and the virtual drive will only be increased by 4TB.
Product
MegaRAID 93xx Series RAID Controller
LSI Storage Authority (LSA)
Overview
Add Physical Drives
Check current drive group and virtual drive configuration
Modify Drive Group
Expand existing partition in the operating system
Verify virtual drive is present, healthy and operational
Add Physcial Drives
Note: Drives are hot swappable so it is not necessary to shutdown or restart the server
Remove an empty drive tray
Place the new physical drive in the tray and use screws to secure it to the tray
Align the drive tray into the slot and gently slide into position using a final levering action to latch the drive in place.
You will feel some resistance just before the drive seats itself into the backplane and the lever arm locks in place. DO NOT FORCE THE DRIVE INTO POSISTION.
A White LED should be visible once the physical drive has been correctly seated
Check Current Drive Group and Virtual Drive Configuration
Launch LSA from the desktop
Enter the operating systems administrators username and password
Use the drop down to Select Controller, the controller dashboard will appear
Physical Drives Tab
Ensure that all Physical Drives are present and have a status of Unconfigured Good
If not, please refer to the following Knowledge Base Article(s) for additional information.
#10632Import or Clear Foreign Configurations Using LSA (LSI Storage Authority)
#10624Managing Physical Drives using LSA (LSI Storage Authority)
All drives should be Unconfigured Good before continuing!
Drive Groups Tab
Make note of the current RAID level the Element(s) Action window appears.
Click on the Drive Group, the Element(s) Action window appears
Note: Do NOT click the (+) plus icon as this will not open the correct Element(s) Action window
Under Element(s) Action, select Modify Drive Group, the Modify Drive Group window appears
Use the drop down and select the RAID Level
Acknowledge the warning “It is advisable to backup data before you proceed. Are you sure you want to continue?“, click Next
Click Add Physical Drives, the Available Unconfigured Drive(s) window will appear
Check the box(s) to select available unconfigured drive(s) to be included in the expansion
Click Add Physical Drives, you will be returned to the Modify Drive Group Window
Review the Drive Group and if necessary click Back to correct settings, Close to abort or Finish to apply
A message indicating the change Completed should appear, click Close
In few moments a Background Process Section will be displayed and when expanded show the virtual drive reconstruction progress.
The reconstruction can take a very long time (Days) and progress should be periodically checked.
NOTE: The Drive Group will not show the new phsical drive(s) or available space until reconstruction has successfully completed.
When completed the Background Processes in Progress window will automatically close
Verify the Virtual Drive status and note the new capacity (LSA Landing Page > Select Controller > Expand Drive Group > Select Drive Group > Expand Properties)
Resizing the Partition
Once the reconstruction has successfully completed the partition must be resized in the operating system before being available for use.
Linux
Follow the instructions found in Knowledge Base Article #10606 “Resizing a Partition on Ubuntu Linux“
Windows
Follow the instructions found in Knowledge Base Article #10667 “Resizing a Partition on Microsoft Windows“
exacqVision Client
The following actions should be taken to ensure that storage is configured correctly and video both past and present are being recorded.
Storage > Drive Tab
Verify the Capacity is correct
Verity the Status is Healthy
Storage > Hardware Tab
Graphic View – Verify all drives are present and healthy
Tree View
Verify the Controller is listed and healthy
Verify the Virtual Drive (Unit 1:/c0/v0) is listed and healthy
Verify all Physical drives (Port 0:/c0/e252/s0, Port 1:/c0/e252/s1, etc. ) are all present and healthy
Search for previosly recorded video
Search for current video or use exacqReplay from Live View
Congratulations the Virtual Drive has been successfully expanded
If the capacity of a virtual drive has been increased; once the reconstruction has successfully completed, then it will be necessary to resize existing partitions before the operating system can utilize the additional space.
Product
Microsoft Windows
exacqVision Server
Overview
Restart the NVR
Stop exacqVision Server Service
Launch Disk Management
Resize the partition
Start the exacqVision Server Service
Check storage, previously recorded and new video
Restart the NVR
Click the Windows Icon, the Power Icon, then choose Restart, the NVR will restart
Stop exacqVision Server Service
Press Windows Key + R, the run box will open, type services.msc, click OK , the Services window will appear
Locate and right-click on exacqVision Server, select Stop, a service control window will briefly appear then close once the service is stopped
Leave the Services Window open
Disk Management
Press Windows Key + R, the run box will open, type diskmgmt.msc, click OK, the Disk Management window will appear
The Virtual Disk should show both the Primary Partition “Original Space” and Unallocated “New Space”
Right-Click on the Virtual Disks Primary Partition, a context window will appear
Select Extend Volume… , the Extend Volume Wizard will launch, click Next to continue
Select the Disk to use space from and the amount of space in MB to extend, click Next
Note: By default, the correct source and maximum available space should already be chosen.
Review the proposed settings and click Back to modify, Finish to apply, or Cancel to abort, the wizard will close
The Virtual Disk should now only have a single partition and show the new storage capacity
Close Disk Management
Start exacqVision Server Service
Open the Services window used previously
Locate and right-click on exacqVision Server, select Start, a service control window will briefly appear then close once the service is started
Close Services
exacqVision Client
Open the exacqVision Client
Navigate to the Drive Tab (Configuration > YOURSERVER > Storage)
Verify the Capacity reported is correct and the status is Healthy
Search for previously recorded video
Verify current video is being recorded
Congratulations the partition has been successfully expanded
Import or Clear Foreign Configurations Using LSA (LSI Storage Authority)
Description
A foreign configuration is a RAID configuration that already exists on a replacement set of drives that you install in a computer system.
Product
MegaRAID 93xx Series RAID Controller
LSI Storage Authority
Importing or Clearing the Foreign Configurations
A foreign configuration is a RAID configuration that already exists on a replacement set of drives that you install in a computer system. You can use the LSI Storage Authority software to import the foreign configuration to the controller or clear the foreign configuration so that you can create a new configuration using these drives. Perform the following steps to import or clear foreign configurations.
Navigate to the Controller dashboard.
Click Configure and then click Foreign Configuration.
The Foreign Configuration window appears, which lists all of the foreign configurations.
Click one of the following options:
• Import All: Import the foreign configurations from all the foreign drives.
• Clear All: Remove the configurations from all the foreign drives.
All physical drives connected to the MegaRAID controller can be managed using LSI Storage Authority.
Product
MegaRAID 93xx Series RAID Controller
LSI Storage Authority
Start and Stop Locating a Drive
If the physical drives are in a disk enclosure, you can identify them by making their LEDs blink.Perform the following steps to identify the physical drives.
Navigate to the physical drive on the Controller dashboard, and select the drive you want to identify, such as Unconfigured Good drive, online physical drive, configured drive, and so on.
Select Element(s) Actions > Start Locate, the corresponding LED on the physical drive starts blinking.
Select Element(s) Actions > Stop Locate to stop the LED from blinking.
Making a Drive Offline
Perform the following steps to place a drive offline. ATTENTION: After you perform this procedure, all of the data on the drive will be lost.
Navigate to the Controller dashboard, and click a drive group name (for example, DG_1).
Click the + icon that corresponds to a drive group to display its contents.
The virtual drives and physical drives associated with the selected drive group appear.
Click the Physical Drive tab, and select a drive that you want to place offline.
Select Element(s) Actions > Make Offline. The drive status changes to Offline.
Making a Drive Online
You can change the state of a physical drive to online. In an online state, the physical drive works normally and is a part of a configured virtual drive.
Navigate to the Controller dashboard, and click a drive group name (for example, DG_1).
Click the + icon that corresponds to a drive group to display its contents.
The virtual drives and physical drives associated with the selected drive group appear.
Click the Physical Drive tab, and select the offline drive that you want to make online.
Select Element(s) Actions > Make Drive Online.
The drive status changes to Online.
Replacing a Drive
You might want to replace a drive if the drive shows signs of failing. Before you start this operation, be sure that an available unconfigured good replacement drive is available. The replacement drive must have at least as much capacity as the drive you are replacing. Perform the following steps to replace a drive. ATTENTION: Make sure to back up the data on the drive before you replace it.
Navigate to the Controller dashboard, and click a drive group name (for example, DG_1).
Click the + icon that corresponds to a drive group to display its contents.
The virtual drives and physical drives associated with the selected drive group appear.
Click the Physical Drive tab, and select a drive which you want to replace.
Select Element(s) Actions > Start Replace Drive.
The Replace Drive dialog appears
Select a replacement drive, and click Replace Physical Drive.
A confirmation message appears.
Select Confirm and click Yes, Replace Drive to proceed with the replace operation.
The drive is replaced and the data is copied to the selected component.
Assigning Global Hot Spares
A global hot spare replaces a failed physical drive in any redundant array, as long as the capacity of the global hot spare is equal to or larger than the coerced capacity of the failed physical drive. Perform the following steps to assign global hot spares.
Navigate to the Controller dashboard, and click the Drives tab.
All of the associated drives appear.
Expand Unconfigured Drives, and select an unconfigured good drive.
Select Element(s) Actions > Assign Global Hot Spare.
The unconfigured good drive is changed to a global hot spare. The status of the unconfigured good drive appears as a global hot spare in the Hot Spares section.
Removing Global Hot Spares
Perform the following steps to remove a hot spare.
Navigate to the Controller dashboard, and click the Drives tab.
All of the associated drives appear.
Expand Hot Spares, and select a hot spare that you want to remove.
Select Element(s) Actions > Remove Global Hot Spare.
The hot spare drive is removed and is listed in the Unconfigured Drives section as an unconfigured good drive
Converting an Unconfigured Bad Drive to an Unconfigured Good Drive
Perform the following steps to convert an unconfigured bad drive to an unconfigured good drive.
Navigate to the Controller dashboard, and click the Drives tab.
All of the associated drives appear.
Expand Unconfigured Drives, and select an unconfigured bad drive.
Select Element(s) Actions > Make Unconfigured.
A confirmation message appears.
Select Confirm and click Yes, Make Unconfigured to proceed with the operation.
A confirmation message appears.
Select Confirm and click Yes, Make Good to proceed with the operation.
The unconfigured bad drive is changed to unconfigured good drive. The status of the unconfigured bad drive appears as unconfigured good in the Unconfigured Drives section.
Erasing a Drive
You can erase data on non-SEDs (normal HDDs) by using the Drive Erase option. For non-SEDs, the erase operation consists of a series of write operations to a drive that overwrites every user-accessible sector of the drive with specified patterns. It can be repeated in multiple passes using different data patterns for enhanced security. The erase operation is performed as a background task. Perform the following steps to erase a drive.
Navigate to the Controller dashboard, and click the Drives tab.
All of the associated drives appear.
Expand Unconfigured Drives and select an unconfigured good drive.
Select Element(s) Actions > More Actions > Drive Erase.
The Physical Drive Erase dialog appears.
The dialog shows the following modes:
• Simple
• Normal
• Thorough
Select a mode, and click Erase Physical Drive.
A warning message appears asking for your confirmation.
Click Yes, Erase Drive.
After the drive erase operation has started, the Stop Erase option is enabled in the Element(s) Actions menu. You can monitor the progress of the erase operation.
Follow these instructions to silence MegaRAID alarms using LSI Storage Authority (LSA).
Product
LSI Storage Authority (LSA)
MegaRAID
Silence the Alarm
When the controller detects an issue an alarm will occur and a high pitched beep will be emitted. This alarm can be silenced through the LSI Software Authority.
Once Logged into LSA a red banner similar to the example below will be present
Click on Silence Alarm
If successful an indicator will appear confirming the Alarm is Silenced.
Creating a MegaRAID Virtual Drive Using LSA (LSI Storage Authority)
Description
Follow these instructions to create a new virtual drive using LSI Storage Authority (LSA).
Product
MegaRAID
LSI Storage Authority (LSA)
Overview
Stop exacqVision Server service
Check current drive group and virtual drive configuration
Create a new drive group
Create a hot spare (optional)
Create a new virtual drive
Initialize the virtual drive in the operating system
Verify virtual drive is present, healthy and operational
Stop exacqVision Server Service
In order to prevent exacqVision from attempting to access or write to the controller it is considered good practice to stop the service before proceeding.
Windows
Press Windows Key+R, type services.msc in the run box then press enter
Locate and Stop the exacqVision Server service
Linux
Launch Terminal (Applications > Systems Tools > Terminal), execute the following command in the Terminal window
sudo service edvrserver stop
Storage drives should be unmounted, enter the command
sudo umount -a
Some devices will not be unmounted and a “Target is busy” message will appear, these can be ignored.
Check Current Drive Group & Virtual Drive Configuration
Launch LSA from the desktop
Enter the administrators username and password
Use the drop down to Select Controller, the controller dashboard will appear
Drive Group & Virtual Drives
Select the Drive Groups tab, verify no Drive Groups or Virtual Drives are configured.
Any existing Drive Groups or Virtual Drives should be deleted. See Knowledge Base Article #10513 “Deleting a MegaRAID Virtual Drive Using LSA (LSI Storage Authority)”
Physical Drives
Ensure that all Physical Drives are present, they also must have a status of Unconfigured Good
If not, clear the configuration too include Foreign configurations.
Clear Configuration
Select Controller Actions > Configure > Clear Configuration, a confirmation window will appear
Select Confirm and then Yes, Clear Configuration
Foreign Configuraiton
Select Controller Actions >Configure > Foreign Configuration, a confirmation window will appearNote: if grayed out then no drives with Foreign Configuration
The Foreign Configuration window appears listing all Foreign Configurations
Click Clear, when prompted select Clear All to remove configurations from all foreign drives
Click Re-Scan to refresh the window, No Foreign configurations should not be found
Select a RAID level for the drive group from the drop-down box, then click NextIf the original RAID level is unknown the RAID level can be determined by the total number of drives being used to create the drive group. RAID 5 for systems with three to eight drives and RAID 6 for systems with 9 or more drives
(Optional) Click Compare and Select to view the detailed information on each RAID level
Select Add Physical Drives
Click the column header “Enlcosure:Slot” until the drives are in listed in ascending order by slot with slot 0 at the top
Check the box to the left of the”Enlcosure:Slot” individually or next to the header to select all AvailableUnconfigured DrivesNote: If a hot spare is needed leave at least 1 drive unchecked
Select Add Physical Drives to add the selected physical drives to the drive group.
Add Hot Spare (Optional)
If an unassigned drive is available then “Add Hot Spares” will be available
Select “Add Hot Spares”
Check the box to the left of the Available Unconfigured Drives.
Click “Add Hot Spares”Note: A Hot Spare drive can be added later if an open slot is available
Create a Virtual Drive
Click Add Virtual Drives
Virtual drives to create:1 (default)
Capacity: (default)The capacity is automatically calculated based on the combined capacities of the physical drives within the drive group and the RAID level chosen.
Virtual Drive Name: Leave as the default
Stripe Size: 256 (default)
Initialization State: Fast Initialization
Read Policy: Read Ahead (default)
Write Policy: Write Back (default)
IO Policy: Direct IO (default)
Disk Cache Policy: Disabled (default)
Click Add Virtual Drives, Information about the newly created virtual drive appears in the Advanced Configuration window.
Review Settings, if necessary select Back to make corrections, once satisfied click Next
Select Finish to add the virtual drive to the drive group and complete Advanced Configuration
Select Close
Initialize the Virtual Disk in the OS
Windows
Press Windows Key+R, type diskmgmt.msc in the run box then press enter
An Initialize Disk Window similar to the following will appear
The default settings should be correct, click OK
The Virtual Drive will be present and show Unallocated, right-click in empty space to the right of Unallocated
A window will appear, choose New Simple Volume
The New Simple Volume Wizard will launch, click Next to continue
Specify Volume Size, by default the maximum size should already be selected, click Next
Assign a Drive Letter, click Next
Format the VolumeFile Systems: NTFS (default)
Allocation unit size: Default (default)
Volume Label: Data
click Next
Review Settings, if necessary go Back to make corrections, once satisfied click Finish
The Virtual Disk should now be a Healthy (Primary Partition) with a Label and drive letter
Close Disk Management
Restart the machine
Linux
From the Desktop open Places and navigate to Computer > File System > usr/local/exacq/server/scripts
Right-Click in an empty spot, a context window will appear, select Open as Administrator
Enter the Linux Administrator password, click Authenticate, a new file explorer window will appear (as superuser)
Launch the raidprep.sh script, select Run in Terminal when prompted
A Terminal terminal window will appear, results of the script will be displayed before it automatically closes
If the following error
Restart the machine
Virtual Drive Verification
The virtual drive should now be fully configured, healthy and operational.
In the exacqVision Client, navigate to Storage
Check the Drive tab, verify the virtual drive is present and healthy
Check the Hardware tab Graphic view, verify
Status is optimal (Optl), Background initialization (x% Complete)
All slots containing a physical drive are healthy
Note: Hot Spares should be listed and with a status of Dedicated Hot Spare
Check the Hardware tab Tree view, verify
Controller is present and Healthy
Virtual Drive (Unit) is present and Healthy
Physical drives (ports 0-#) are present and Healthy
If a hot spare was created it should be listed and have a status of Dedicated Hot Spare
Deleting a MegaRAID Virtual Drive Using LSA (LSI Storage Authority)
Description
Instructions for deleting a MegaRAID virtual drive using LSA (LSI Storage Authority)
Product
LSI Storage Authority
MegaRAID
Prerequisite
Caution: The exacqVision Server service should be stopped before proceeding
Windows
Press Windows Key+R, type services.msc in the run box then press enter
Locate and Stop the exacqVision Server service
Linux
Launch Terminal (Applications > Systems Tools > Terminal), execute the following command in the Terminal window
sudo service edvrserver stop
Deleting a Virtual Drive
There can be several reason why you may wish to delete a virtual drive
The virtual drive is failed and cannot be recovered
Physical drive replacement to expand capacity
caution: All data on a virtual drive is lost when you delete it. Make sure to back up the data before you delete a virtual drive.
Launch LSA from the desktop
Enter the administrators username and password
Use the drop down to Select Controller, the controller dashboard will appear
From the Controller dashboard, select the Drive Groups Tab, click the + icon next to the drive group name (example DG_0). The Drive group will expand and the virtual and physical drives associated with the selected drive group appear.
Select the virtual drive, a check will appear to the left of the drive group name and Element(s) Action will display available actions
Select Element Action > Delete
Select Confirm and click Yes, Delete, a message momentarily appears confirming that the virtual drive was deleted successfully, Drive Groups should show the following