Categories
Cloudvue Cloudvue Cameras Knowledge Support Cloudvue Gateway Cloudvue Access Control Support Categories Products

Cloudvue Advance Replacement RMA Process – North America

Description 

Please use the following steps when creating a Cloudvue Advance Replacement RMA in North America.

Solution

Complete the normal Cloudvue RMA Process for North America, see KB #13217 for instructions.

From the RMA Salesforce Case Email Will Anderson <will.anderson@jci.com>  requesting that he create a sales order. 

The email should include the following information:

  • Partner:
  • Account:
  • Device MAC Address(es):
  • Device Model(s):
  • Contact Name
  • Contact Phone #
  • Contact Email
  • Shipping Priority:
  • Shipping Address:
  • Description:

IMPORTANT:  Since the RMA case will be assigned to Neal Johnson make sure to follow the Salesforce Case so you will get notifications when emails are sent to the RMA case.

Categories
Cloudvue Cloudvue Gateway Products

Unable to log into Cloudvue

Description 

Unable to log into Cloudvue shows as password is incorrect when it is not.

Product 

Cloudvue

Solution

Please open the broswer as In Private or Incognito Mode

Categories
Knowledge Support Cloudvue Cloudvue Cameras Cloudvue Gateway Support Cloudvue Access Control Categories Products

Cloudvue Release Process

Description 

The Cloudvue release process involves multiple components and regions.  In addition to the cloud software there are C2C, Cloudvue Manager, Cloudvue Mobile and Cloudvue Access.  Generally, software will release to NA first and if no issues are detected to EMEA and AU a few days later.  This pattern is followed for each component with C2C and Cloudvue Manager released together.   The complete release cycle can take several weeks before all components to be completed.

Cloud

Engineering must  supply a cab file containing all the cloud components such as OS, Database, anything that runs in the cloud to the SRE team for approval.  Once approved it is then implemented by region, replacing all current Cloud components. 

You can view the release summaries outlining what enhancements, fixes and integrations have been made by logging into Cloudvue Manager and going to https://dashboard.cloudvue.com/releases

Cloudvue Gateways

When available software updates can be manually applied to individual Cloudvue Gateways via Cloudvue Manager.  In addition, Engineering can automatically push update to Cloudvue Gateways using the release manager.    https://dashboard.cloudvue.com/releases/manage

C2C

Software updates for C2C devices are like Cloudvue Gateways with the exception that the updates are not automatically pushed.  C2C devices must be manually updated.

Cloudvue Mobile

Software updates for Cloudvue Mobile are made available through the appropriate play store.

Cloudvue Access

Cloudvue Access consists of the mobile application which can be updated through the appropriate play store and the KT-1 controller software and firmware which can manually be updated from the devices page in Cloudvue Manager.

Categories
Cloudvue Cloudvue Cameras Knowledge Support Support Illustra Categories Products

Connecting an Analog Microphone to a Cloudvue C2C Camera

Cloudvue’s cloud-based recording solution provides the ability to record and playback audio. Many models of Illustra IQ cameras configured for Camera to Cloud (C2C) recording with Cloudvue’s services provide audio capabilities. Check your specific Illustra IQ camera model to determine audio support.

Considering audio quality, refer to manufacturer recommendations and guidelines on microphone selection and installation placement.

<br>

Camera Terminals

When examining your Illustra IQ camera, locate the I/O terminals. Determine which terminals are used for audio input. Examples from different models of Illustra IQ cameras are pictured below.

In this image, the icon with the triangle on the right is the positive terminal. The spaced lines on the left indicates ground.

<br><br>

Microphone Wiring

You will need a microphone with a pre-amplifier capable of producing a line level output that can be connected directly to the camera’s audio inputs.

If using a mic level output microphone, you will need a mic pre-amp to boost the audio to line level output for connection to the rear audio input terminals. Some microphones on the market have built-in pre-amps and others may require an external pre-amp.

There are many analog microphone options on the market. This article will focus on the Louroe Verifact A microphone used with an APR-1 single zone base station since it is a very commonly encountered device.

Looking at the back of a Louroe base station you will see that there are terminal inputs to connect your microphone to the base station and RCA style jacks for input and output.

The terminals on the microphone and base station are marked A, B, and C. Connect A on the mic to A on the base station, B to B, and C to C.

Since the audio output from the Louroe base station is an RCA jack and the camera does not have RCA audio inputs, you have two options. You may strip the wire end of a common RCA to RCA audio cable or purchase an RCA to bare wire cable. These may be found online and have already been striped and separated for you.

Connect the RCA connector to the audio output of the base station. With the bare end of the wire you’ll connect the conductor wire to the positive audio input terminal. In most cases this will be red. Connect the ground wire to the negative/ground audio input terminal, this will usually be black.

<br><br>

Preparing the Camera

Prior to changing the camera to Cloudvue Mode you will need to enable audio functions.

NOTE: Audio recording is restricted by law in many areas so this is disabled by default. Check the laws for audio monitoring and recording in your area prior to use since these can vary from video recording laws.

If your camera is already in Cloudvue Mode you will need to factory default it, then log into it as you would a standard IP camera using your web browser. Follow the camera manual’s steps for factory defaulting the device and accessing it within your web browser.

  1. Navigate to the Audio page, under the System menu.
  2. Check the box to Enable Audio.
  3. Select ‘External’ from the Input Source drop-down (only applicable on select models).
  4. Check that the Input Enable box is marked.
  5. Adjust the Input Volume level as needed.

After enabling audio, you will enable Cloudvue Mode.

  1. Navigate to the Maintenance page, under the System menu.
  2. Select the Cloudvue tab.
  3. Enter the Cloudvue Partner and Cloudvue Data Center as directed by your Cloudvue dealer before clicking the Apply button.

<br><br>

Cloudvue Audio Configuration

Follow the steps listed elsewhere for adding video devices to your Cloudvue account.

From your Cloudvue Settings page, select the Devices tab.

Beneath the C2C Settings section, click the Audio tab. This tab features a volume slider, which you may need to use to adjust for your installation. Note, the checkbox beside the Mute setting is disabled, stating it is in the ‘Off’ position. This is the default behavior and allows audio to be recorded. Checking the box, changing it to ‘On’, will mute all audio and nothing will be recorded or heard.

<br><br>

Audio Playback

The Archive search timeline in Cloudvue does not require that audio channels be selected and does not display audio on the timeline. When playing recorded video, the associated audio will automatically be played back with the corresponding video and is included with saved clips.

<br>

Categories
Video Library Configuration Cloudvue Cloudvue Access Control Youtube Video Library Categories Products

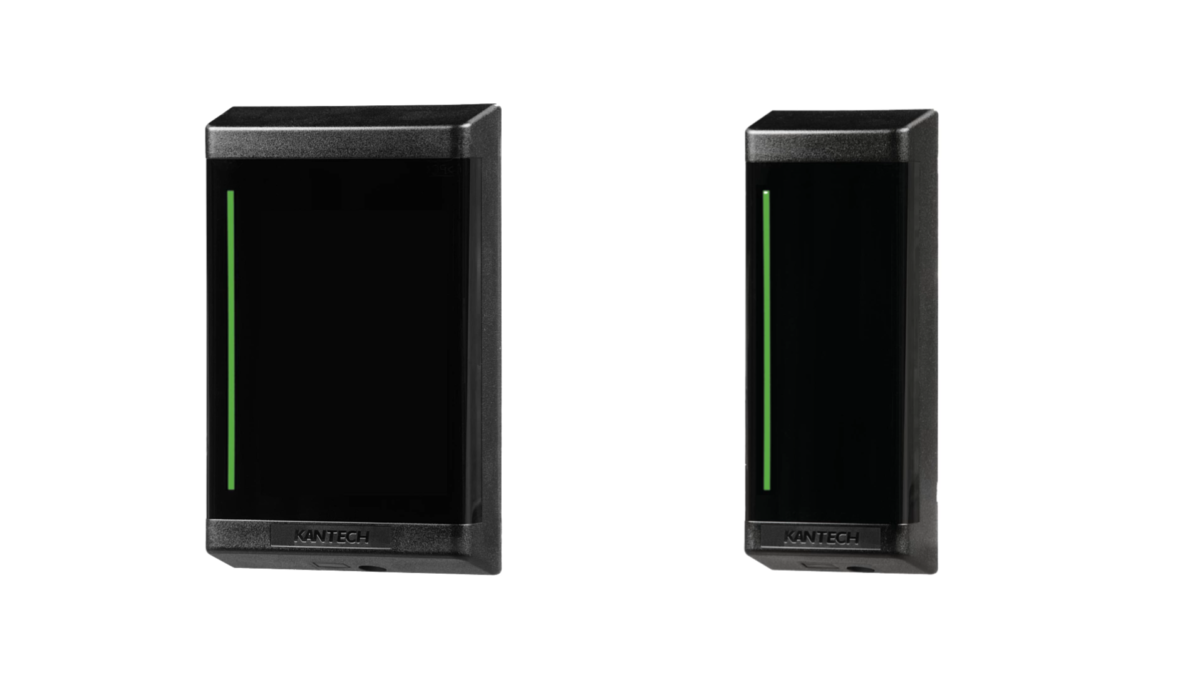
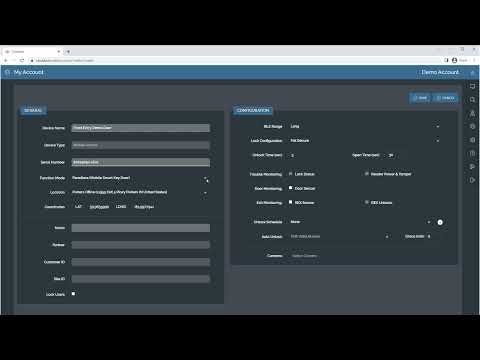
Adding a Kantech KT-1 with ioSmart Reader to Cloudvue

This video will walk you through connecting a Kantech KT-1 controller using an ioSmart Reader to Cloudvue. Be sure you have followed the steps in a separate video on configuring the KT-1 Controller for Cloudvue Mode before proceeding.


  • After connecting your ioSmart Reader to the KT-1 controller, connect the system to your network to communicate with Cloudvue.
  • Add the ioSmart Reader to the account before adding the KT-1 controller.
  • Press the Account button, then choose the Devices tab.
  • Click the Add New Device button and select Add Mobile Access Device.
  • Enter a Name.
  • Enter the Serial Number, located on the back of the reader, followed by a dash and the confirmation code, also on the back of the reader.
    Example: 123A456B-CD78
  • Select Function Mode. Choose Panel Based (Mobile Credential Reader) when using with a controller, such as the KT-1.
  • Panelless installations of ioSmart Readers do not have controllers, such as the KT-1, they are standalone readers.
  • Select the Location.
  • Save changes.
  • Add the KT-1 Controller. Return to the Devices tab and press the Add New Device button, then select Add Access Control Device.
  • With the controller added, enter the controller’s settings to associate the ioSmart Reader with the controller. From the settings page, select the Readers tab.
  • Check the Mobile Credentials box, allowing uses to use the Cloudvue Access mobile app as well as cards and fobs.
  • Use the drop-down selector beside the ioSmart Serial number field to select the previously configured ioSmart Reader.
  • Click Save.

<br>

Categories
Video Library Cloudvue Installation Cloudvue Access Control Youtube Video Library Categories Products

Kantech ioSmart Reader Firmware Update Tool

This video walks users through the process of updating the firmware of ioSmart Readers using the ioSmart Reader Firmware Update Tool over an RS-485 connection.


  • A Kantech ioSmart Reader’s firmware can be updated through a connected controller, such as the KT-1.
  • There may be situations where you wish to update several readers prior to deployment or when performing a panelless deployment where you do not have a controller. Firmware may be updated over RS-485 using Kantech’s ioSmart Firmware Upgrade Tool.
  • You will need an RS-485 output device such as the Kantech USB-485 module. This device connects to a PC’s USB port and provides RS-485 output terminals to connect to the reader. You can also achieve this with many third-party USB and RS-232 to RS-485 converters.
  • Login to Kantech’s website and navigate to Software Downloads. Click to expand Door Controllers and Readers before selecting ioSmart.
  • Download the latest ioSmart Reader firmware as well as the ioSmart Reader Firmware Upgrade Tool.
  • Extract the ioSmart Reader firmware from the downloaded ZIP file.
  • Connect the converter module to your PC.
  • Locate the COM port used by your PC using Device Manager. Note the COM port used by the converter module.
  • Use some spare wire or low voltage jumper wires to connect the converter to the terminals on the back of the reader.
    • If using Kantech’s USB -485 module:
      X+ to D1/X+
      X- to D0/X-
    • If using third-party converter:
      TX+ to D1/X+
      TX- to D0/X-
  • Provide 12 VDC power to the reader. Connect the positive wire to the PWR terminal and negative to GND.
  • Run the ioSmart Reader Firmware Upgrade Tool. The first time it is run it will warn it cannot find the Defaults file, this can be ignored.
  • Use the drop-down menu to select the COM port you noted earlier in Device Manager. Test the connection using the Get FW Version button. Wired correctly, this should return the version currently loaded on the reader.
  • Click the Firmware Upgrade button, then select the extracted firmware file from the ZIP file with the .BIN file extension.
  • Clicking Open will begin the update immediately.
  • When the upgrade is finished a Success message will appear. You can then close this window and the reader will restart.

<br>

Categories
Knowledge Support Cloudvue Cloudvue Gateway Support Categories Products

Gateway Tools Designed for Cloudvue Only

Description 

Gateway Tools are designed to work with Cloudvue only and will display a “Device Offline” error if launched from Cloudvue Local.

Product 

  • Cloudvue
  • Cloudvue Local

Steps to Reproduce 

  • Access an NVR via Cloudvue Local
  • Navigate to Settings > Settings Tab > Gateway Tools
  • Click either Sync Gateway or Reboot Gateway

Expected Results 

Popup Message “Device Offline” “Reconnect Device to Continue”

Solution

This is by design, use Cloudvue (www.cloudvue.com) to launch Gateway Tools

STWELVE-10439

Categories
Knowledge Support Cloudvue Support Cloudvue Access Control Categories Products

Incorrect Data Centre Registering KT-1 to Cloudvue

Description 

When converting a KT-1 to Cloudvue mode sometimes the datacenter does not save to the correct location.

Product 

  • Cloudvue Manager
  • KT-1

Steps to Reproduce 

  1. Setup a KT-1
  2. Convert this to Cloudvue mode and select the data centre

Expected Results 

Data centre is saved as EMEA or AU

Actual Results 

Data centre still says North America and it is not on any data centre

Solution

Ensure the KT-1 is on FW version 3.09

Ensure you can access the Cloudvue and there are no network ports blocked

<br>

Categories
Video Library Cloudvue Knowledge Support Installation Cloudvue Access Control Support Youtube Video Library Categories Products

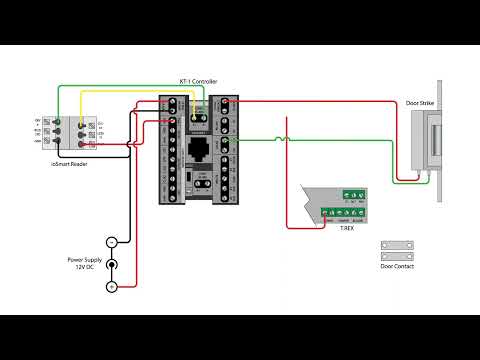
KT-1 Controller with ioSmart Reader Wiring

This video shows example diagrams on wiring a Kantech ioSmart reader to the KT-1 and KT-1 PCB single-door controllers.


The diagrams displayed in the video can also be viewed below.

KT-1 Single Gang controller and ioSmart Reader
KT-1 PCB controller and ioSmart Reader

<br>

Categories
Sales Materials Cloudvue Data Sheets Categories Products

Cloudvue VMS Data Sheet

Cloud-Managed Video, Access and Intelligence
Cloudvue-VMS-Data-Sheet_v2306.pdf