Categories
Video Library Cloudvue Installation Cloudvue Access Control Youtube Video Library Categories Products

Kantech ioSmart Reader Panelless Installation Wiring

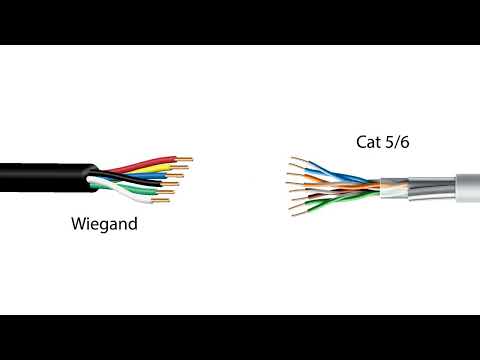
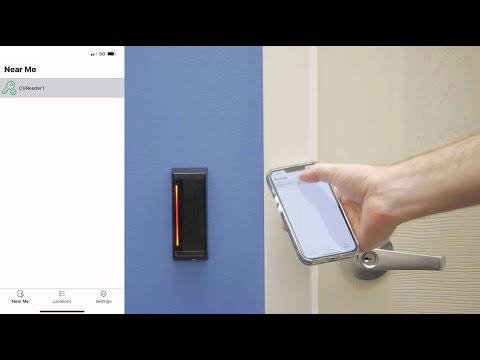
This video details the wiring connections for installing the Kantech ioSmart Reader for panelless installations. Panelless mode involves independent ioSmart Readers for access control without connecting to control panels and uses your smart phone device as your access key.
Categories
Video Library Configuration Cloudvue Highlighted Video Guides Cloudvue Access Control Youtube Video Library Categories Products

ioSmart Reader Panelless Enrollment

Learn how to enroll a Kantech ioSmart Reader in panelless mode for use with Cloudvue access control.
Categories
Knowledge Support Cloudvue Support Cloudvue Access Control Categories

Kantech EntraPass Go Pass App no Longer Supported by Cloudvue

Description 

The Kantech EntraPass Go App Version 2.20 broke the Cloudvue integration forcing users to migrate to Cloudvue Access. The Kantech Entrapass Go App will no longer be supported for accessing Cloudvue, and the Cloudvue Access App should be used instead.

Product 

  • Cloudvue Access App
  • EntraPass Go Pass App
  • Kantech panelless ioSmart Bluetooth Card Readers

Solution

Kantech EntraPass Go App is no longer supported please use the Cloudvue Access App instead. See Knowledge Base Article #13379 for Instructions on Installing Cloudvue Access.

Categories
Knowledge Support Cloudvue Cloudvue Cameras Cloudvue Gateway Support Cloudvue Access Control Categories Products

Cloudvue Custom Views

Description 

Views are used to group multiple cameras or controllers onto a single view. This article explains how to create and modify Cloudvue custom views along with how to assign and unassign users from them as well.

Product 

  • Cloudvue
  • Cloudvue Mobile App

Solution

Creating a View and Assigning Users

  • Login to Cloudvue as an Administrator
  • On the navigation bar select Account
  • Select Views
  • Select Add New View
  • Give the view a Name
  • Expand and Select devices to Assign them to the view
  • When finished assigning devices, Select Users
  • Assign desired Users
  • Select Save to save the assigned users and be returned to the View page
  • Select Save to save the view
  • The view will now be accessible under Custom Views for users assigned to the view

Modifying an Existing  View and Assigned Users

  • Login to Cloudvue as an Administrator
  • On the navigation bar select Account
  • Select Views
  • In the Views section edit an existing view by clicking the pencil icon to the right of the Views Name
  • Devices can be added or removed from the view as desired
  • Users can be assigned or unassigned to the view by selecting Users
  • Add or remove Assigned Users by checking or unchecking the selection box next to the User
  • When finished Select Save to save the assigned users and be returned to the View page
  • Select Save again to save the view

Additional Information

Cloudvue Training Videos –  Cloudvue Custom Views

Categories
Cloudvue Knowledge Support Cloudvue Access Control Support Categories

Installing Cloudvue Access App

Description 

Instructions for installing the Cloudvue Access app for both Android and Apple devices.

Product 

  • Cloudvue Access
  • Entrapass Go Pass

Solution

Android

  • Access the Play Store
  • Search for and Install Cloudvue Access

iOS

  • Access the App Store
  • Search for and Install Cloudvue Access

Verify The Device

Once Installed you must first verify your mobile device before being able to control devices

  • Open Cloudvue Access
  • Enter your mobile phone number, including country code
  • Select Verify Device
  • You will receive an SMS message containing a verification code
  • When/If prompted allow Cloudvue Access
    • Select device location preference
    • Allow Bluetooth communications
    • Turn on Bluetooth
    • Allow Cloudvue Access to send you notifications
  • Enter your mobile phone number
  • Create and verify a new password
  • Enter the SMS verification code
  • Submit
  • Agree to the Cloudvue Terms of Service & EULA
  • Accept the Privacy Notice
  • Close, re-open and login to Cloudvue Access
  • You should now be able to access and control your devices from Cloudvue Access
Categories
Knowledge Support Cloudvue Cloudvue Access Control Support Categories

Panelless ioSmart Readers Not Unlocking Doors and Unable to Enroll New Readers

Description 

Customers have reported that they are unable to unlock doors using previously enrolled  ioSmart readers in panelless mode.  In addition users are unable to enroll new readers.  Engineering is aware of the issue and a fix will soon be pushed to all controllers.

Products

  • Cloudvue
  • Cloudvue Access App
  • Cloudvue Mobile App
  • EntraPass Go Pass App
  • Kantech panelless ioSmart Bluetooth Card Readers

IMPORTANT:  Users MUST transition from EntraPass Go Pass App to the “Cloudvue Access” app #13418. See Knowledge Base Article #13379 for Instructions on Installing Cloudvue Access

Solution #1 – Using Cloudvue

  • From the Cloudvue (https://www.cloudvue.com)
  • Select Views
  • Expand Devices
  • Select the desired reader
  • Choose Settings
  • Select Save (Note: No other changes are necessary)

Solution #2 – Using Cloudvue Manager

  • From Cloudvue Manager
  • Search Mobile Access Devices
  • Select the Device and choose Edit Reader
  • In the “Edit Mobile Access Device” Window select Submit
  • Note: No other changes are necessary
Categories
Knowledge Support Cloudvue Cloudvue Access Control Support Categories

KT-1 Controller Firmware Must be v3.06.09 or Higher for Cloudvue Mode

Description

In addition to requiring a network with internet access the Kantech KT-1 controller must be running firmware v3.06.09 or higher to run in Cloudvue Mode.

Solution

To determine the current firmware version, access the KT-1 controller from a web browser.


Type https:// and the IPv4 address of the KT-1 or if using the MAC address type https://kt-xx-xx-xx where xx-xx-xx is the last six characters of the KT-1 controllers MAC address


Note: The MAC address can be found on a label located on the front of the KT-1 controller’s main board.

IMPORTANT

If the KT-1 is running a firmware lower than v2.09.02 you must first update to v2.09.02 before updating to v3.06.09 or higher. Firmware version 2.09.02 can be downloaded Here.


See the KT-1 Cloud User Guide for additional detailed instructions including how to update the KT-1 controllers firmware.

Categories
Knowledge Support Cloudvue Support Cloudvue Access Control Categories Products

Kantech EntraPass Go Pass no Longer Shows Panel-less ioSmart Bluetooth Card Readers

Description 

The Kantech EntraPass Go Pass App Version 2.20 has broken the Cloudvue Integration and customers are no longer showing panel-less ioSmart Bluetooth Card Readers resulting in them being unable to unlock doors.

Product 

  • EntraPass Go Pass App version 2.20
  • Kantech panel-less ioSmart Bluetooth Card Readers

Solution

Please advise customers they will need to install the Cloudvue Access App which should resolve the issue allowing them to control their readers. See Knowledge Base Article #13379 for instructions on installing the Cloudvue Access App

Categories
User Guides Cloudvue Documentation Cloudvue Access Control Categories Products

KT-1 Cloud User Guide v1.05

KT-1-Cloud-User-Guide-v1.05-1.pdf
Categories
User Guides Cloudvue Documentation Cloudvue Access Control Categories Products

Cloudvue Mobile Access Control User Guide
Cloudvue Mobile Access Control User Guide
Cloudvue-mobile-access-user-guide_lt_en.pdf