Categories
Documentation Quick Start Guides exacqVision Mobile exacqVision Webservice Categories Products

exacqVision Mobile Connection Changes

The most recent release of the exacqVision Mobile app represents a departure from the previous functionality of Exacq Mobile 3. Previous versions of the mobile app connected to the exacqVision Web Service. The Web Service acted as a client to the Server, passing video between the server and mobile app.

Changes in the architecture of the exacqVision Server along with a mobile app rewritten from the ground up now allow the mobile app to connect directly to the exacqVision Server. 

The exacqVision Web Service will continue as a product but will no longer be needed for those using the exacqVision Mobile app. When installing the exacqVision Server Bundle users may opt not to install the Web Service. Deployments which will still require the Web Service will be those in which users use the Web Browser Client, cannot update the exacqVision Server to a version supporting this, or which rely on the evWebAPI for integrations. 

<br>

Categories
User Guides Documentation Categories Products

exacqVision v2.0 Hardening Guide

exacqVision-v20-Hardening-Guide.pdf
Categories
Cloudvue Cameras Cloudvue Documentation Quick Start Guides Cloudvue Gateway Categories Products

Cloudvue Networking Diagrams

Cloudvue Gateway

<br>

Cloudvue Camera to Cloud (C2C)

<br>

Categories
User Guides Documentation Illustra exacqVision Server Categories Products

Using the Illustra License Registration Tool

Overview

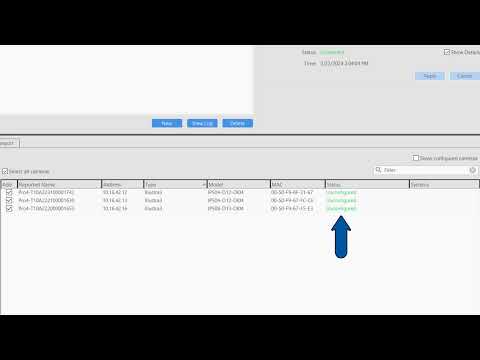
Users entitled to free IP camera licensing from eligible Illustra cameras may easily claim a new license key for their exacqVision system online, without the need to contact Orders.

NOTE: It is best practice to declare your eligible cameras and apply the generated license as a first step during NVR setup to prevent those devices which may be freely licensed from consuming your paid licenses. This will save you time performing additional steps.

Requirements

  • The NVR must be a system Built By Exacq (BBE), third party hardware with licensed exacqVision software is not eligible.
  • Cameras must be on the eligible camera list. See link within the tool.
  • The exacqVision Server license must have a current SSA.

Steps

  1. Access the Illustra License Registration page through the Dealer Portal or using the links within the exacqVision Client (24.03 and higher).
    <br><br>
  2. Enter the licensed MAC Address or system Serial Number.<br><br>
  3. The Current License field will update to display the number of paid and free Illustra licenses as well as the license level.
    <br><br>
  4. Beneath the MAC Address / Serial Number field, use the drop-down selector to enter the number of Illustra devices to add.<br>
    NOTE: Only eligible Illustra devices will work with the free licenses, so it is best to be accurate with the number of devices used. Additionally, inflating this number will incur additional costs when it comes time to renew the SSA for your system. The number of licenses charges for SSA renewal will be displayed on the right, below the New License section.<br><br>
  5. The New License section will appear below your Current License section. The New License fields indicate the total number of licenses for the system, broken down by paid and free Illustra licenses, along with the SSA expiration date.
    <br><br>
  6. Complete the fields for the Dealer information.<br><br>
  7. Enter the End User information for licensing.<br><br>
  8. Enter additional email addresses to send the soon to be generated license key to.
    <br><br>
  9. When you are ready, select the Declare Cameras button to generate the new license key.<br><br>
  10. Apply the new license to your exacqVision Server.
    See How to I apply a license to an exacqVision Server

<br>

Categories
Documentation Quick Start Guides exacqVision Mobile Categories exacqVision Webservice

Remote exacqVision Connection Diagrams
The method used for connecting to an exacqVision system from outside the LAN it resides on will depend on your network configuration and use case. Examples are provided below based on each method.

Remote Connections

Remote Connections are supported by exacqVision Server/Client 24.09 and above to facilitate connections from the exacqVision Mobile app. When considering the network configurations Remote Connections eliminate the need to open ports or enable port forwarding rules on your router by using Exacq’s Remote Connectivity service. Users of the mobile app enter an access code generated by the system admin and the Remote Connectivity agent handles the connecting of the mobile app user and the Server.

NOTE: Remote Connectivity does not accept connections for the Desktop Client software or the earlier Exacq Mobile 3 app. Only exacqVision Mobile 24.09 and higher are supported.

<br>

Traditional

In a traditional setup, the site’s router is configured to port forward incoming external connections on each port. The ports configured for forwarding incoming traffic vary depending on whether users will connect via exacqVision Desktop Client software, the web browser client, or a mobile app.

<br>

Web Relay Service

Sites using exacqVision Web Service 19.06 and higher may wish to take advantage of the web service Relay, which provides a web-based proxy to connect to, avoiding the need to configure the router for port forwarding. When enabled, the exacqVision Web Service Status page will display the Relay Service IP. Remote users will then be able to connect their Exacq Mobile 3 app or web browser client directly to this proxy IP address.

NOTE: The Relay Service does not accept connections for the Desktop Client software, only web browser and Exacq Mobile 3 connections.

<br><br>

Related Articles

<br>

Categories
User Guides Documentation Categories Products exacqVision Hardware

ASRock Industrial IMB-X1314 System Beep Codes

Beep SequenceDescriptionTroubleshooting
1 short constant beepError with RAM refresh1. Check RAM for physical damage.
2. Try another stick of RAM.
3. BIOS update
2 short beepsRAM parity error1. If adding new memory, try removing to see if this fixes issue.
2. Check for conflicts in memory types.
3. Check power supply for unstable voltages.
3 short beepsRAM read/write test failed1. Repair corrupted files.
2. Perform memory tests
4 short beepsSystem clock errorTry synchronizing system time with an internet (NTP) time source.
5 short beepsCPU errorCheck that CPU is properly seated.
6 short beepsKeyboard not detected/
keyboard controller error
Check keyboard is properly connected or try a different keyboard.
7 short beepsGeneral CPU or RAM error1. Check that CPU is properly seated and connected.
2. Check that RAM is properly seated and connected.
3.Inspect connections for dirt or corrosion.
8 short beepsGraphics controller errorCheck for proper connections to any graphics cards installed and that enough power is provided to the card.
9 short beepsROM errorCheck if system is attempting to boot from an external device.
10 short beepsROM read/write error1. Run a memory diagnostic, such as mdsched.exe in Windows.
2. Clear CMOS
11 short beepsCPU cache check failure1. Check CPU temperature.
2. Inspect CPU fan for proper function.
3. Clear dust or dirt from CPU fan.
4. Check for faulty CPU heatsink.

<br>

Categories
User Guides Documentation Categories exacqVision Hardware Products

ASRock Industrial IMB-X1313 System Beep Codes

Beep SequenceDescriptionTroubleshooting
1 short constant beepError with RAM refresh1. Check RAM for physical damage.
2. Try another stick of RAM.
3. BIOS update
2 short beepsRAM parity error1. If adding new memory, try removing to see if this fixes issue.
2. Check for conflicts in memory types.
3. Check power supply for unstable voltages.
3 short beepsRAM read/write test failed1. Repair corrupted files.
2. Perform memory tests
4 short beepsSystem clock errorTry synchronizing system time with an internet (NTP) time source.
5 short beepsCPU errorCheck that CPU is properly seated.
6 short beepsKeyboard not detected/
keyboard controller error
Check keyboard is properly connected or try a different keyboard.
7 short beepsGeneral CPU or RAM error1. Check that CPU is properly seated and connected.
2. Check that RAM is properly seated and connected.
3.Inspect connections for dirt or corrosion.
8 short beepsGraphics controller errorCheck for proper connections to any graphics cards installed and that enough power is provided to the card.
9 short beepsROM errorCheck if system is attempting to boot from an external device.
10 short beepsROM read/write error1. Run a memory diagnostic, such as mdsched.exe in Windows.
2. Clear CMOS
11 short beepsCPU cache check failure1. Check CPU temperature.
2. Inspect CPU fan for proper function.
3. Clear dust or dirt from CPU fan.
4. Check for faulty CPU heatsink.

<br>

Categories
User Guides Documentation Categories Products exacqVision Hardware

ASRock H410 System Beep Codes

Beep SequenceDescriptionTroubleshooting
1 short constant beepError with RAM refresh1. Check RAM for physical damage.
2. Try another stick of RAM.
3. BIOS update
2 short beepsRAM parity error1. If adding new memory, try removing to see if this fixes issue.
2. Check for conflicts in memory types.
3. Check power supply for unstable voltages.
3 short beepsRAM read/write test failed1. Repair corrupted files.
2. Perform memory tests
4 short beepsSystem clock errorTry synchronizing system time with an internet (NTP) time source.
5 short beepsCPU errorCheck that CPU is properly seated.
6 short beepsKeyboard not detected/
keyboard controller error
Check keyboard is properly connected or try a different keyboard.
7 short beepsGeneral CPU or RAM error1. Check that CPU is properly seated and connected.
2. Check that RAM is properly seated and connected.
3.Inspect connections for dirt or corrosion.
8 short beepsGraphics controller errorCheck for proper connections to any graphics cards installed and that enough power is provided to the card.
9 short beepsROM errorCheck if system is attempting to boot from an external device.
10 short beepsROM read/write error1. Run a memory diagnostic, such as mdsched.exe in Windows.
2. Clear CMOS
11 short beepsCPU cache check failure1. Check CPU temperature.
2. Inspect CPU fan for proper function.
3. Clear dust or dirt from CPU fan.
4. Check for faulty CPU heatsink.

<br>

Categories
User Guides Documentation Categories Products exacqVision Hardware

ASRock C236M WS System Beep Codes

Beep SequenceDescriptionTroubleshooting
1 short constant beepError with RAM refresh1. Check RAM for physical damage.
2. Try another stick of RAM.
3. BIOS update
2 short beepsRAM parity error1. If adding new memory, try removing to see if this fixes issue.
2. Check for conflicts in memory types.
3. Check power supply for unstable voltages.
3 short beepsRAM read/write test failed1. Repair corrupted files.
2. Perform memory tests
4 short beepsSystem clock errorTry synchronizing system time with an internet (NTP) time source.
5 short beepsCPU errorCheck that CPU is properly seated.
6 short beepsKeyboard not detected/
keyboard controller error
Check keyboard is properly connected or try a different keyboard.
7 short beepsGeneral CPU or RAM error1. Check that CPU is properly seated and connected.
2. Check that RAM is properly seated and connected.
3.Inspect connections for dirt or corrosion.
8 short beepsGraphics controller errorCheck for proper connections to any graphics cards installed and that enough power is provided to the card.
9 short beepsROM errorCheck if system is attempting to boot from an external device.
10 short beepsROM read/write error1. Run a memory diagnostic, such as mdsched.exe in Windows.
2. Clear CMOS
11 short beepsCPU cache check failure1. Check CPU temperature.
2. Inspect CPU fan for proper function.
3. Clear dust or dirt from CPU fan.
4. Check for faulty CPU heatsink.

<br>

Categories
User Guides Documentation Categories Products exacqVision Hardware

ASRock H110-E1 System Beep Codes

Beep SequenceDescriptionTroubleshooting
1 short constant beepError with RAM refresh1. Check RAM for physical damage.
2. Try another stick of RAM.
3. BIOS update
2 short beepsRAM parity error1. If adding new memory, try removing to see if this fixes issue.
2. Check for conflicts in memory types.
3. Check power supply for unstable voltages.
3 short beepsRAM read/write test failed1. Repair corrupted files.
2. Perform memory tests
4 short beepsSystem clock errorTry synchronizing system time with an internet (NTP) time source.
5 short beepsCPU errorCheck that CPU is properly seated.
6 short beepsKeyboard not detected/
keyboard controller error
Check keyboard is properly connected or try a different keyboard.
7 short beepsGeneral CPU or RAM error1. Check that CPU is properly seated and connected.
2. Check that RAM is properly seated and connected.
3.Inspect connections for dirt or corrosion.
8 short beepsGraphics controller errorCheck for proper connections to any graphics cards installed and that enough power is provided to the card.
9 short beepsROM errorCheck if system is attempting to boot from an external device.
10 short beepsROM read/write error1. Run a memory diagnostic, such as mdsched.exe in Windows.
2. Clear CMOS
11 short beepsCPU cache check failure1. Check CPU temperature.
2. Inspect CPU fan for proper function.
3. Clear dust or dirt from CPU fan.
4. Check for faulty CPU heatsink.

<br>