This document assumes you have installed Enterprise Manager version 24.12 or higher and wish to enable SSL for HTTPS connections to the Enterprise Manager webpage.
NOTE: For a trusted certificate, it is recommended that you purchase a third-party intermediate certificate from one of many online providers. Exacq cannot guarantee the legitimacy or security of a certificate.
Product
- exacqVision Enteprise Manager
CREATING A SELF-SIGNED SSL CERTIFICATE
These steps will detail how to create a self-signed certificate:
Command: sudo openssl req -new -x509 -sha256 -days 365 -nodes -out server.crt -keyout server.key
You will be prompted with a series of questions.
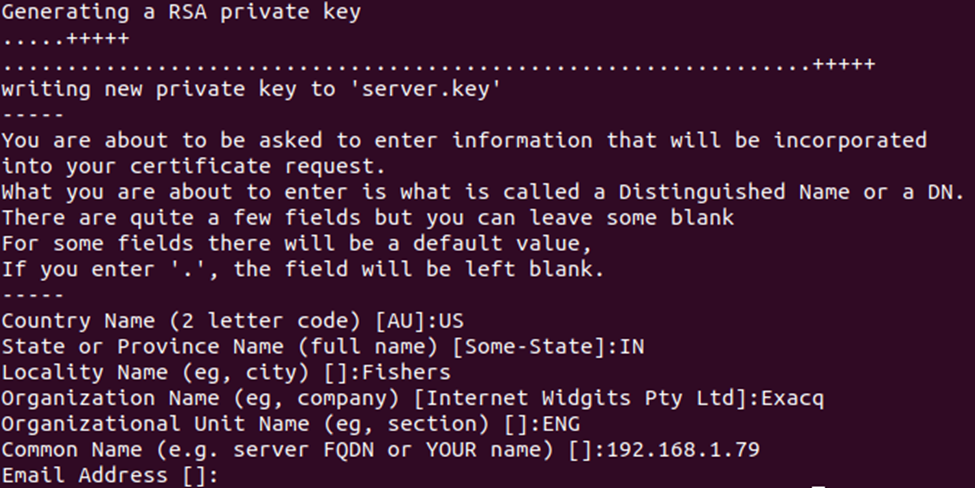
• Use data specific to your site.
• Items can be left blank with the exception of Common Name
• Common Name (e.g. server FQDN or YOUR name) should be the IP address of EM Server
Summary of above command:
• Generates a self-signed SSL/TLS certificate (server.crt) and its associated private key (server.key).
• The certificate is valid for 365 days and uses the SHA-256 algorithm for signing.
• The certificate is not encrypted with a passphrase (-nodes), making it suitable for automated server use.
• Both the certificate and the private key are saved in the current directory (or the directory you run the command from).
Explanation of the components:
• sudo:
This runs the command with superuser (administrator) privileges. It might be needed if you’re creating the certificate in a restricted directory (like /etc/ssl/).
• openssl:
This is the OpenSSL command-line tool, a widely used tool for working with SSL/TLS certificates, keys, and other cryptographic operations.
• req:
This specifies the certificate request command in OpenSSL. It’s used to create a certificate signing request (CSR) or a self-signed certificate. In this case, you’re generating a self-signed certificate.
• -new:
This tells OpenSSL to create a new certificate or certificate request.
• -x509:
This option tells OpenSSL to generate a self-signed certificate (as opposed to generating a CSR, which is usually used to request a certificate from a certificate authority).
When you use -x509, it creates a certificate that is signed by the private key, without requiring a third-party certificate authority (CA).
• -sha256:
This specifies that the SHA-256 hashing algorithm should be used for the certificate’s signature. SHA-256 is a secure and commonly used hashing algorithm.
This helps ensure the integrity of the certificate and is a more secure choice compared to older algorithms like SHA-1.
• -days 365:
This specifies the validity period of the certificate in days. In this case, the certificate will be valid for 365 days (i.e., one year). After this period, the certificate will expire.
You can adjust this value based on your needs.
• -nodes:
This stands for “no DES” (Data Encryption Standard). It means that the private key will not be encrypted with a passphrase.
• -out server.crt:
This specifies the output file where the self-signed certificate will be saved. In this case, the certificate will be saved as server.crt
• .-keyout server.key:
This specifies the output file for the private key. The private key will be saved as server.key.
The private key is used by the server to encrypt/decrypt data and should be kept secret. It’s paired with the public key in the certificate.
Validate the Cert and Key files
sudo openssl x509 -noout -modulus -in /path/to/server.crt | openssl md5
sudo openssl rsa -noout -modulus -in /path/to/server.key | openssl md5
Verify the md5 hashes match.

ENABLING SSL FOR HTTPS CONNECTIONS
The server configurations are already implemented to enable the HTTPS connection for Uvicorn (asgi server).
The above command creates the two files named server.key and server.crt.
Take those file paths and add them into the settings.yaml file:
The settings.yaml file is under %/esm/ directory.
cd /usr/local/exacq/esm/
vi settings.yaml

Update the settings.YAML file.

Edit the above configurations in the settings YAML file and save it. (esc + :wq!)
- Restart the web server
sudo service enterprise-webservice stop
sudo service enterprise-webservice start
FORCED REDIRECT FROM HTTP TO HTTPS
We need to set the enable-redirect value to ‘true’ in order to redirect http to https and then restart the web server.
Restart the web server:
sudo service enterprise-webservice stop
sudo service enterprise-webservice start
OBTAINING A THIRD-PARTY CERTIFICATE
If you are planning to acquire a third-party certificate from a trusted provider, you may need to provide them with a Certificate Signing Request (CSR) file.
You may use our tool at the following URL to generate a CSR file. https://exacq.com/support/gencsr/
Enter all the fields click on the ‘Submit’ button to download the ZIP file. Inside this ZIP file is the CSR file and RSA key to give to your certificate provider.
If you purchased a chained certificate, be sure to download the appropriate intermediate bundle.
Once you have downloaded the files from your provider:
- Rename the .crt file to ‘server.crt’.
- Rename the .key file to ‘server.key’.
- If you have a chained certificate, rename the chain file to ‘server-ca.crt’.
Place the renamed files from your Certificate Authority (CA) into the following directory:
- Windows: C:\Program Files\exacqVision\EnterpriseManager\apache\conf\
- Linux: /etc/evapache/
TIPS
When purchasing an SSL certificate, many providers offer an Intermediate Bundle, or additional certificates that must be present to link your certificate to a root certification authority. Usually the provider will have documentation on how to accomplish this with Apache, but it is a good idea to ask them before or during the purchasing process. Exacq is not responsible for making your certificates capable of working with Apache.
It is possible to combine all the intermediate certificates that a provider may give you into one file. Consult your provider for more information.