Categories
Video Library Installation Highlighted Video Guides exacqVision Server Youtube Video Library Categories Products

exacqVision System Licensing

This video will walk new system installers and users through several methods available to apply license keys their exacqVision VMS.<br><br> Chapters:<br> 00:00 Intro<br> 00:20 About License Keys<br> 00:59 exacqVision Advantage<br> 01:25 Method 1 – Import from exacq.com<br> 02:27 Method 2 – Import from Key file<br> 02:58 Method 3 – License Retrieval<br> 03:54 Method 4 – Manual entry<br> 04:17 System Recovery<br> <br>
Categories
Cloudvue Cameras Knowledge Support Cloudvue Cloudvue Gateway Support Categories Products

Prompted to “Checkout” When Saving Cloudvue Subscriptions

Description 

When using a global admin staff account I am being prompted to CHECKOUT and provide credit card information when updating camera subscriptions.

Product 

  • C2C
  • Cloudvue Gateway

Steps to Reproduce 

  • Access device via Cloudvue Manager
  • Expand Subscriptions
  • Apply desired subscription to all cameras
  • Click SAVE SUBSCRIPTIONS button

Expected Results 

  • SAVE SUBSCRIPTIONS button is displayed and subscriptions are saved when clicked

Actual Results 

  • CHECKOUT button is displayed and Credit Card Information is required

Solution

Check the Partners FIN Type. If the partners FIN Type is set to Stripe then the end user will need to use Cloudvue.com or Cloudvue Mobile to apply the subscriptions themselves and provide a credit during checkout.

See AES-995 for additional details.

Categories
exacqVision Enterprise Windows Knowledge Support Support exacqVision Enterprise Products

Enterprise Manager memory resource usage high due to importer

Exacq Support has identified an issue with Enterprise Manager importer processes using an excessive amount of memory resource, often requiring reboot due to system becoming unresponsive when installed on some Windows machines. This is estimated to affect versions 23.06.2.0 thru latest versions of ExacqVision Enterprise Manager for Windows. Developers are aware and working on resolving these issues.

NOTE: This high memory resource usage often corresponds with errors seen in importer log exceptions. You can trace the PID this process starts up on in importer-error logs to the process in task manager in Windows.

Product 

  • ExacqVision Enterprise Manager
  • 23.06.2.0 – 24.06.2.0

Solution

Engineering has developed a temporary workaround consisting of a PowerShell script developed to scan for and kill certain importer processes when their memory usage is at unacceptable levels. This script runs every 5 minutes, unless code is altered. This script should only be used as a last resort for Support personnel to deploy when all troubleshooting and other remediation steps have been exhausted. In some cases it may be recommended to alter the MemoryCeiling function of this script to better suite certain customer scenarios.

It is also recommended that this script be triggered as a scheduled task from task scheduler. This often requires that Execution Policies be bypassed to launch successfully on reboot. Detailed instructions are below:

1) Download the importerMonitor.ps1 script from:

https://support.exacq.com/#/file-manager/33becef0-0ab8-4b0f-9127-94884ac262a6/em-dev-build

2) Unzip the file and place the importerMonitor.ps1 file in a directory. Often times, it is best to place this in: “%\Program Files\exacqvision\”

3) Open Task Scheduler in windows and Create Task, then name task importerMonitor and configure an admin user and to run whether user is logged on or not. Be sure to check the box for Run with highest privileges, and configure for OS in use.

4) Under triggers, select New… Then configure for “At Startup”.

5) Under the Actions tab, select New… and configure as follows:
– Start a Program
– Program/script: Powershell.exe
– Add arguments: -ExecutionPolicy Bypass – File “C:\Program Files\exacqVision\importerMonitor.ps1”

6) Configure the conditions tab as pictured:

7) Configure the Settings tab as pictured:

8) Reboot to test the Task at startup, and verify it worked as expected by observing the History tab in Task Scheduler for this task:


<br>

Categories
Documentation Integrations exacqVision Client Categories Products exacqVision Integrations Uncategorized

Elgato Stream Deck Integration Guide

Overview

When configured properly, exacqVision may be configured to react to Elgato Stream Deck to take actions, such as changing camera views or activating output alarms. This is made possible by exacqVision’s Serial Profile settings combined with Event Monitoring or Event Linking. This guide provides the steps needed to get started, which you may customize to suit your needs.

IMPORTANT: This guide is provided for user benefit, but Exacq Support will not provide assistance or troubleshooting for Stream Deck devices or Stream Deck software.

<br>

Stream Deck Configuration

  1. Download and install the Stream Deck software, which includes drivers needed to recognize the device when plugged into your workstation as well as software used to customize its behavior.<br><br>
  2. Open the Stream Deck software from the Start menu or system tray on the taskbar. Stream Deck has limited capabilities out of the box, but provides a marketplace where developers offer plugins to expand its functions, similar to adding apps to your mobile phone or tablet.<br><br>
  3. With the Stream Deck software window open, access the Marketplace by selecting the Marketplace icon, which will open a web browser to the Marketplace page.<br><br>
  4. Use the search field to find CommandSender, which at the time of this writing was the most capable plugin available for this purpose and free to download and install.<br><br>
  5. Click on CommandSender in the search results, then select the Get button. Once installed, return to the Stream Deck software.<br><br>
  6. Locate and expand the Custom section from your actions panel on the right, then expand the CommandSender item. Drag an instance of the Send Command action from the panel onto a button in your layout. This button is customized in the lower part of the window.<br><br>
  7. Set the Communication Type to ‘TCP’.<br><br>
  8. Enter the IP address of the system running your exacqVision Server into the IP Address field. The Port number defaults to ‘45671’, but you may customize this if that port is already being used on your system.<br><br>
  9. In the Command Pressed field, enter something unique and descriptive to the action you want to take. In the pictured example we enter GoToCamera 09 because in later steps we will configure a camera panel to change when pressed. This text can be anything you’d like because you will pair it to an action in later steps.<br><br>
  10. Next, add the code for a line feed, \x0a, to the end of your command. This is used to help separate commands when received by exacqVision.<br><br>
  11. You will not use the Command Released field for use with exacqVision.<br><br>
  12. Finally, you can choose to customize the icon using icons from Stream Deck, import icon packs from the Marketplace, or upload custom icons you’ve created. You also have an optional Title field.<br><br>
  13. You may add as many instances of the CommandSender plugin to your button layout as you wish, but the Command Pressed field should be unique for each one. The IP Address and Port fields should be the same unless you are sending commands to different NVRs.<br><br>

<br>

exacqVision Serial Port Configuration

You will need Full Admin or Power User privileges on the system to perform the following steps. The steps in this section are performed only once on each NVR you are sending commands to.

  1. Open the exacqVision Desktop Client application and enter Configuration mode by selecting the cog wheel icon in the upper-left corner.<br><br>
  2. From the left-hand navigation panel, expand the system name, then select the Serial Ports node on the tree.<br><br>
  3. Under the IP section, press the New button.<br><br>
  4. In the new row that appears, enter something in the Name field, such as “Stream Deck”.<br><br>
  5. Change the Use column to ‘POS’.<br><br>
  6. Change the Profile field to ‘New…’.<br><br>
  7. Change the Type field to ‘TCP Listener’.<br><br>
  8. In the Address column field, enter the IP address of the workstation you have plugged your Stream Deck into.<br>
    NOTE: It is expected that you will connect the Stream Deck to a Client workstation, but if you are connecting it directly to the system running the exacqVision Server application, the IP Address used here and in CommandSender will be 127.0.0.1.<br><br>
  9. In the Port field, enter the port number displayed in CommandSender, which by default is ‘45671’.<br><br>
  10. The remaining fields are left as is.<br><br>
  11. Because ‘New…’ was selected in the Profile column, when you press the Apply button you will be automatically taken to the Serial Profiles page to configure the profile described in the next section.<br><br>

<br>

exacqVision Serial Profiles Configuration

  1. Begin by providing a descriptive Name to your Serial Profile.<br><br>
  2. Test the ability to receive commands from the Stream Deck by pressing the configured CommandSender button on the panel. You should see the commands you configured on the button appear in the data window.<br><br>
  3. For this use case you do not need to enter anything into the fields for SOT marker or EOT marker.<br><br>
  4. Select the Event Keywords tab.<br><br>
  5. Press the New button.<br><br>
  6. In the String field, enter the text exactly as you entered when configuring the button in CommandSender, without the line feed code.<br><br>
  7. Press Apply to save your changes.<br><br>

<br>

NOTE: If you need additional help with the configuration of Serial Ports or Serial Profiles, please see the exacqVision User Manual or refer to our User Training Videos on the Exacq Support Portal covering these features.

<br>

Event Monitoring and Event Linking

As this document is not intended to be a complete training guide on the use of exacqVision’s Event Monitoring and Event Linking features, we will provide a single example of changing a camera panel to display another camera when the button is pressed. Keep in mind that Event Monitoring provides client-side actions visible to the user of the workstation, such as changing camera panels, live Views, enabling audio, or digital PTZ presets, while Event Linking performs server-side actions, such as recording video, mechanical PTZ presets, auto exports, sending notifications, or triggering webhooks.

NOTE: For additional help with the configuration of Event Monitoring or Event Linking, please see the exacqVision User Manual or refer to our User Training Videos on the Exacq Support Portal on these features.

For this example:

  1. Select the Event Monitoring node on the navigation tree, located near the top of the left-hand panel.<br><br>
  2. Press the New button under the Profiles panel and enter a descriptive Name in the Profile Configuration area to the right.<br><br>
  3. Change the Show Event List field to ‘On Event’.<br><br>
  4. Check the Show Newest Event box.<br><br>
  5. Set the Type selection to ‘Video Panel’.<br><br>
  6. The first Client Action is added for you. Configure the default action by selecting ‘Default’ from the Event Type panel. Default events do not have an Event Source to select.<br><br>
  7. From the Action Type panel, select ‘Switch Video’.<br><br>
  8. Select a camera from the Action Target panel to display when nothing else is being triggered.<br><br>
  9. Press the New button under the Client Actions panel in the middle of the window.<br><br>
  10. From the Event Type panel, highlight ‘Serial Profile’.<br><br>
  11. You may have many items listed on your system, or several systems to select from. The drop-down menu will filter to specific systems or show them all. Select the item displaying the name of the Serial Profile you created earlier with the Keyword you configured. The profile is monitoring the incoming data being sent from CommandSender on your Stream Deck for this Keyword.<br><br>
  12. Select ‘Switch Video’ from the Action Type panel.<br><br>
  13. Choose a camera from the Action Target panel that you want to display when the Stream Deck button is pressed.<br><br>
  14. Next, you’ll set exacqVision to return to the Default camera after a set number of seconds rather than forcing a user to click in the Event List panel to acknowledge it each time.<br><br>
  15. Uncheck the Confirm checkbox near the bottom of the window.<br><br>
  16. Change the Timeout field to “5”.<br><br>
  17. Press the Apply button to save your changes.<br><br>

<br>

Use the same Event Monitoring profile you just created to continue adding additional Client Actions for each CommandSender button you have configured on the Stream Deck.

Navigate to the Live view in the Client window to test your setup.

  1. Drag several different cameras to the layout.<br><br>
  2. Right-click one of the panels. In the menu that appears, expand Event Monitor, and select the name of the Event Monitoring profile you just created. The camera you configured as the Default should display.
    <br><br>
  3. Press the CommandSender button you created on the Stream Deck. This camera panel should now change from the default camera to the camera you configured in your Event Monitoring profile with the Event Keyword.<br><br>
  4. After the 5 second timeout period you set, the camera panel should return to the Default camera.

<br>

Opening the exacqVision Client

If you’d like to create a button on your Stream Deck to automatically open an instance of the exacqVision Client, this can be done without additional plugins or serial data configuration using the built-in Open action.

Within Stream Deck, perform the following:

  1. Expand the System menu from the actions panel.<br><br>
  2. Drag an instance of the Open action from the panel onto an empty button in the layout.<br><br>
  3. Customize this instance near the bottom of the window.<br><br>
  4. Provide an optional Title and/or customize the button’s icon.<br><br>
  5. In the App/File field, either navigate to the edvrclient.exe file on your machine, or enter the path manually. The default path is C:\Program Files\exacqVision\Client\edvrclient.exe

Users of customized Client .XDV files may open instruct the Open action to open the client using their desired .XDV file by adding the file path to the file. e.g.- C:\Program Files\exacqVision\Client\edvrclient.exe -F"C:\Users\myUserName\Documents\myCustomFile.xdv"

<br>

Categories
Video Library Documentation Quick Start Guides Installation Highlighted Video Guides Youtube Video Library Categories Products exacqVision Hardware

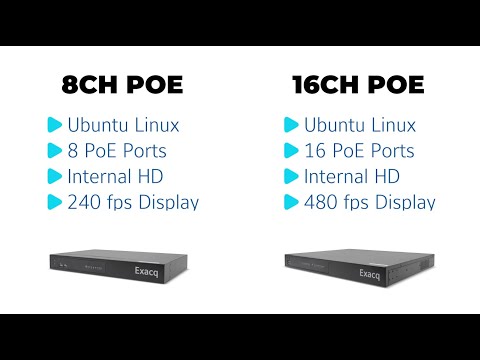
exacqVision G-Series PoE Quick Start Video

The G-Series PoE NVRs provide affordable exacqVision recorders with built-in power over ethernet capability. Follow along to step through setup and adding your PoE powered cameras to the system.<br><br> Chapters:<br> 00:00 Intro<br> 00:17 Unboxing<br> 00:41 Specifications<br> 01:10 Hardware Ports<br> 03:03 Setup & Network Addressing<br> 04:31 Licensing<br> 05:18 Adding PoE Powered Cameras<br> <br>
Categories
Video Library Documentation Quick Start Guides Installation Highlighted Video Guides Youtube Video Library Categories Products exacqVision Hardware

exacqVision G-Series Micro Quick Start Video

The G-Series Micro provides an exacqVision solution in an ultra-small form factor for customers who wish to leverage a smaller system design or in space-constrained locations such as retail shops, restaurants, banks, and small offices. Follow along for installation and setup.<br><br> Chapters:<br> 00:00 Intro<br> 00:22 Unboxing<br> 01:07 Specifications<br> 02:09 VESA Mount<br> 03:17 Setup<br> 04:30 Licensing<br>