Categories
Video Library Configuration User Guides Illustra exacqVision Client exacqVision Server Youtube Video Library Categories Products

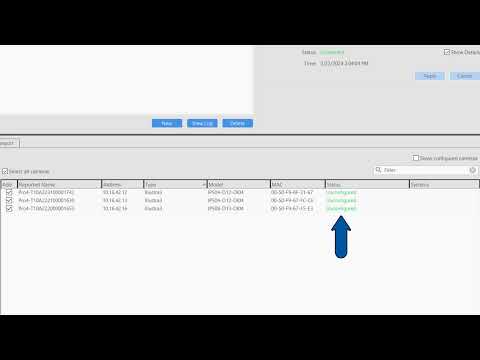
How to Add IP Cameras – Quick Add

Learn how to use the new Quick Add feature, introduced in exacqVision Server/Client 24.03 to remove the multistage process of setting up and adding new cameras to your exacqVision system. Quick Add combined with the Illustra Registration License tool provide an easy to use experience when pairing Illustra cameras with Exacq.

For a written article of these steps, see the Add IP Cameras – Quick Add article.

<br>

Categories
Knowledge Support Support exacqVision Server Categories Products

Lost or Forgotten Camera Password

Description

Passwords for cameras and other IP devices connected to exacqVision are stored in encrypted form. They may not be reset or viewed from the exacqVision software or configuration. This is intended for your system and device protection.

Solution

In the event you are unable to login to the device, you will need to factory reset the device so that you may set new administrator credentials. You may then edit or re-add the device to your exacqVision software.

Refer to the documentation provided by the device manufacturer for details on how to default/factory reset the device.

<br>

Categories
Knowledge Support Support exacqVision Server Categories Products

Lost or Forgotten Server Admin Password

Description

User passwords are stored in an encrypted form for your system security.

When non-administrative users lose/forget their credentials, a system administrator may login to reset these. However, if the credentials for the exacqVision Server administrator account have been lost/forgotten, these cannot be recovered.

Solution

In cases where administrative access to the system can longer be achieved, you must uninstall the exacqVision Server application and reinstall it.

  1. Begin the uninstallation process.<br><br>
  2. When prompted, opt to remove configuration files.<br><br>
  3. Reboot the machine to complete the full removal of all program files.<br><br>
  4. Log into the operating system with administrator privileges and re-install the exacqVision Server. This process will prompt you to create the credentials for the system administrator. <br><br>
  5. You will then need to add devices, add your system users, and configure the system.<br><br>
  6. When you have completed restoring the configuration, backup the system configuration using the Settings Export button on the Configure System > System tab.<br><br>

Categories
Knowledge Support Support exacqVision Server Categories Products

Ubuntu Server Support

Description

NVRs built and sold by Exacq with Ubuntu Linux use the Ubuntu Desktop release.

Ubuntu is also released in a Ubuntu Server format. The primary difference being that Ubuntu Server does not have a graphical desktop environment and may not include many applications and packages that are installed by default with Ubuntu Desktop.

Ubuntu Server is primarily used in enterprise environments on headless systems and interaction with the operating system is done via CLI. It is possible for exacqVision to be installed on third-party systems running the Ubuntu Server operating system.

IMPORTANT: Ubuntu Server should not be considered for use by those unfamiliar with Linux operating systems. Exacq Support will not provide troubleshooting help with these installations.

<br>

Downloading

As Ubuntu Server does not have a GUI, the simplest method of obtaining the installer is the use of the wget command.

  1. Using a separate system with a web browser, navigate to the Exacq.com Software Downloads page.<br><br>
  2. Hovering the cursor over the link for your desired installer, or right-clicking and selecting Copy Link Address will provide you with the URL to use in the following process.<br>
    *Note that the path and the installer file include the version number.<br><br>
  3. Using the CLI of your Ubuntu Server system, use the wget command to download this installer to your system. In the example below, replace the URL with that from your intended link as mentioned in Step 2, above.
    wget &lt;URL&gt; --no-check-certificate<br><br>
  4. Refer to Installing exacqVision Software on 64-bit Ubuntu for the steps to run the installer on your system.<br><br>
  5. After install, you may then connect to and manage the exacqVision Server using the exacqVision Client software installed on another machine on the same network. The Client software may be installed on Linux, Windows, or Mac operating systems.

<br>

Categories
exacqVision Server Edge Documentation Quick Start Guides Illustra exacqVision Server Categories Products

Setup and Licensing exacqVision Edge/Edge+

Description

exacqVision Edge is a complete video management system (VMS) software solution that runs directly on an IP camera and stores video to an microSD/SD card inserted in the camera.

Supported Devices

Use the filters on the exacqVision IP Camera Integration database to search for devices that support exacqVision Edge.

Installers

Download the appropriate installer for your device. Installers are listed by device model on the Software Downloads page.

Upload

Devices will vary by manufacturer and firmware version. The steps for Illustra IQ cameras are depicted below.

  1. Log into the device through the web browser interface. Out-of-box or factory defaulted devices will likely require steps to choose basic device settings and configure the administrator user account and credentials. Refer to the device’s documentation for details.<br><br>
  2. Locate the application management page within the device. Pictured below, Illustra IQ devices feature an Applications page from within the Applications menu.
    <br><br>
  3. Select the installer file previously downloaded from Exacq.com to upload.


    NOTE: Some cameras may not allow the application to upload until a microSD/SD card has been inserted, formated, and mounted.<br><br>
  4. Uploaded applications typically begin running automatically after uploading. If the application does not appear to be running, use the device controls to start the application.
    <br><br>
  5. The exacqVision Edge application is NOT licensed through the device itself. Disregard the License option within the camera’s web interface and proceed to the Licensing steps below.<br><br>

Licensing

  1. If you have not already done so, download and install the exacqVision Client software on a workstation you intend to you for viewing and management of the Edge device.<br><br>
  2. Within the exacqVision Client, use the cog wheel icon to access the Configuration screen.<br><br>
  3. Navigate to the Add Systems page and add the Edge VMS using the IP address of the camera you installed the Edge application on as the server Hostname/IP Address. Rather than entering the credentials to log into the camera, the system credentials will still be default. Enter the following for intial setup:
    Username: admin
    Password: admin256<br><br>
  4. Upon initial connection with the default credentials the exacqVision software will prompt you to change the default credentials to those known only to you.<br><br>
  5. After changing the Edge Server credentials, you will see the exacqVision Server appear on your system tree to the left. Expand the server node and click to select the Configure System option.
    <br><br>
  6. Select the System tab from the top of the Configure System page.<br><br>
  7. Within the License section of this page, either manually enter the license key or use the Import button options to upload the license key to authorize your Edge application.
    <br><br>
  8. Navigate to the Add IP Cameras page and confirm the camera is now shown as connected in the IP Camera List. It is normal to see that the Address is 127.0.0.1 because the Edge application is running directly on the camera, thus it will display the local loopback address rather than the networked IP address of the camera.
    <br><br>
Categories
User Guides Documentation exacqVision Client Illustra Categories Products

Add IP Cameras – Quick Add

Description

The Quick Add tab, found on the Add IP Cameras page of the exacqVision Client is a recently added feature. Introduced in version 24.03, this feature accelerates the configuration and addition of supported camera models to your exacqVision system.

<br>

Products

  • exacqVision Server 24.03 and higher
  • exacqVision Client 24.03 and higher
  • Illustra IQ Pro Gen4
  • Illustra IQ Pro Gen3
  • Illustra IQ Flex Gen4
  • Illustra IQ Flex Gen3

Quick add requires both exacqVision Server and exacqVision Client versions 24.03 or higher. Only Illustra Pro and Flex Gen3/4 cameras are supported at this time. The Flex Multisensor (IFS16-M10-BT03) does not support Quick Add.

<br>

Pro Tip: If your Illustra IQ cameras are eligible for free licensing, apply your updated license key prior to adding cameras to avoid consuming paid camera channels. Contact your integrator or dealer for details.

<br>

Steps

  1. Connect out-of-the-box or factory defaulted Illustra IQ cameras to your NVR’s network.<br><br>
  2. Navigate to the Add IP Cameras page within the exacqVision Client.<br><br>
  3. Select the Find IP Cameras tab on the bottom half of the page.<br><br>
  4. Discover cameras by pressing the Rescan Network button.
    <br><br>
  5. The Find IP Cameras tab will list all discovered devices whether Quick Add is supported or not. The Quick Add tab will display the number of Quick add supported devices found. You will also see a note beside the Add Selected button. Select either of these to be taken to the Quick Add tab.
    <br><br>
  6. Select the Quick Add supported devices you wish to configure and add using the checkboxes from the list.<br><br>
  7. Press the Edit button and enter the desired Username and Password credentials to be used for the selected devices. Click Save when done.
    <br><br>
  8. Press the Add Selected button in the bottom corner to begin the Quick Add process. The status of the devices will change as each configuration stage is completed on the device. Each selected device will then appear in the IP Camera List above and begin the process of securely connecting to the server.
    <br><br>
  9. After initial use of the Quick Add feature, the created credentials may be used for subsequent Quick Add operations. Username and Password fields are pre-filled with the previously used credentials when returning to the Quick Add tab.<br><br>
  10. Selecting the Edit button allows you to enter a different set of credentials from those previously used.<br><br>
  11. Selecting the View button will prompt users to authenticate to the server with Admin credentials. Once authenticated, the Password will display in plain text for 20 seconds. You may choose to use the copy icon beside the Password field to copy this to the system’s clipboard. The clipboard contents are also cleared after 20 seconds.
    <br><br>

<br>

Categories
Knowledge Support Support exacqVision Client exacqVision Mobile Categories Products

How to Determine if a Mobile User is Connected Through Remote Connections

Description

The exacqVision Mobile application provides the ability to connect straight to the exacqVision Server service, without the use of the exacqVision Web Service, when using server version 24.09 and higher. This connection can be made directly or by means of the Remote Connections feature. This article instructs users on how to determine which method a mobile user is/has connected with.

See also:

<br>

Steps

  1. Open the exacqVision Desktop Client software.<br><br>
  2. Navigate to the Configuration screen.<br><br>
  3. Select the Server name from the system tree on the left-hand side to reach the System Information page.<br><br>
  4. The System Usage panel in the upper-left lists all currently connected users.<br><br>
  5. Mobile connected users will display ‘ipv4:‘ before the IP address in the Address column.<br><br>
  6. The IP address of the mobile device will be shown when connected directly to the system without the use of the Remote Connections feature.<br><br>
  7. If connected through the Remote Connectivity agent, the IP address will be 127.0.0.1.<br><br>
  8. If searching for prior connections using the Login History tab on the bottom half of the System Information page, the addresses there will also be shown according to items 5, 6, and 7 above.<br><br>

<br>

Categories
Knowledge Support Video Library Demo Support exacqVision Client exacqVision Server exacqVision Mobile Categories Products

2024-03 March Exacq Release Training

This training covers the following topics:

Quick Add – Requires exacqVision Server and Client 24.03 or higher. Supports only Illustra Flex and Pro Gen 3/4 cameras.

Architecture changes – Changes made in how the new exacqVision Mobile app connects to exacqVision Server and when exacqVision Web Service is still required.

Remote Connectivity – Provided for exacqVision Mobile support. Requires exacqVision Server and Client 24.03 or higher.

exacqVision Mobile – Demo of new exacqVision Mobile app, including navigation, creating Views, use of Focus View, saving and exporting clips, adding servers, audio, and PTZ.

<br>

Categories
User Guides Documentation exacqVision Client exacqVision Server exacqVision Mobile Categories Products

Remote Connections

exacqVision Server and Client versions 24.09 introduce our Remote Connections feature. This added feature currently only supports exacqVision Mobile. Connections for the Desktop Client, Exacq Mobile 3, or Web Client remain unchanged.

Products

  • exacqVision Server 24.09 and higher
  • exacqVision Client 24.09 and higher
  • exacqVision Mobile 24.09 and higher

What benefit does Remote Connections provide?

  • Ease of Setup – There is no need to configure routers to open ports and/or port forwarding, or configure additional software. This relay previously required configuration through the Web Service.
  • Authorization – Mobile users enter a single-use code provided by the exacqVision administrator to add a server connection.
  • Encryption – Enforces SSL/TLS connections.

Why don’t I have to configure port forwarding?

Traditionally, users outside of a LAN wishing to connect to services inside a LAN initiated the connection request. This can still be done if users choose this method.

However, when Remote Connectivity is enabled, the exacqVision software takes advantage of the fact that routers usually permit devices already inside the private network to initiate connections to outside services. This is what allows your web browser to load web pages without configuring port forwarding on your router. The exacqVision server establishes a secure connection to our Remote Connectivity agent. Users of the exacqVision Mobile app then connect to this Remote Connectivity agent. The Remote Connectivity agent handles the secure passing of data between the exacqVision Server and the user’s app.

What is this code users enter?

The Remote Connections feature provides another layer of security over just usernames and passwords. exacqVision administrators press a button within the exacqVision Client to create one or several single-use codes. A user wishing to add an exacqVision Server instance to their mobile app must enter the code provided by their system administrator before it expires (within 24hrs). The code is only needed for the initial connection to the server. Unless the user deletes the system from their mobile app, there is no need to enter a code the next time the app is used.

<br>

Related Articles

<br>

Categories
Knowledge Support Support exacqVision Server Categories Products

Changing the Mobile Listening Port for exacqVision Server
When using the exacqVision Mobile app with the release of exacqVision Server 24.09 or higher, the exacqVision Mobile app will connect directly to the exacqVision Server service rather than require the intermediary exacqVision Web Service.

By default the service will listen for incoming mobile app connections on port 8443. This may be manually changed by the system administrator to accommodate network needs when needed.

<br>

Product

  • exacqVision Server, version 24.09 and above
  • exacqVision Mobile, version 24.09 and above

<br>

Steps

  1. Log into the system running the exacqVision Server instance with administrative privileges.<br><br>
  2. Locate the following configuration file:
    • Windows: C:\Program Files\exacqVision\Server\nvrsdkpi.xml
    • Linux: /usr/local/exacq/server/nvrsdkpi.xml<br><br>
  3. Open this JSON configuration file with the text editor of your choice.
    • Windows: Open the text editor choosing, ‘Run as Administrator’
    • Linux: Run with sudo privileges when needed.<br><br>
  4. Identify the line that reads:
    &lt;SecureUri value="0.0.0.0:8443" /&gt;<br><br>
  5. Replace ‘8443’ with the port number of your choosing. Be sure this is not a port already in use.<br><br>
  6. Save the file.<br><br>
  7. Restart the exacqVision Server service.

<br>