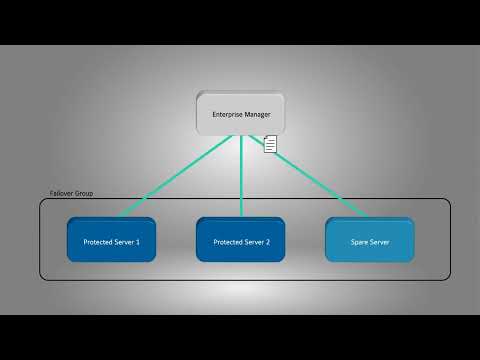
Enable automatic system failover to prevent loss in recording when an ExacqVision server loses network connectivity or is brought down for maintenance.
Learn how to create a failover group for automated failover, perform a manually triggered failover, and how to failback to the original state.
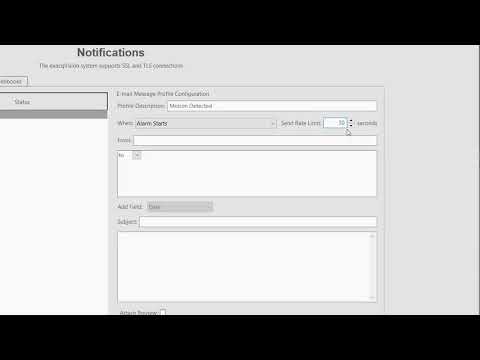
Configure email servers and email notifications to send notifications when events occur. This video shows how to add your mail server (SMTP) and how to configure message profiles. Use these profiles with Event Linking to automate sending messages to users.
After selecting a PTZ preset motion appears to stop working in the camera’s web interface. If you edit the motion settings in the client, the motion will events will start to work in the camera again.
Product
Camera models:
QNP-6230 PTZ
QNP-6230H PTZ
Firmware:
fw 1.40.02_20191031
fw 1.40.03_20201203_R410
Steps to Reproduce
Have the camera setting on the home preset.
Select a second PTZ preset for the camera to move to. In the photo below you can see that the camera’s web interface indicates motion has stopped in the graph to the right of the camera’s image.
Motion stops working in the cameras gui.
Go to client and edit any motion window settings.
Motion will resume in the cameras gui.
Note if on a tour- this will also be affected by the movement of the presets.
Expected Results
PTZ tours or presets should work after the camera moves to the new preset location.
Actual Results
The camera stops detecting motion events after a preset is selected and the camera has moved.
Solution
Testing has shown that firmware 2.10.02_20220324_R614 has corrected this behavior on the camera.
When setting up the Dynamic DNS feature on exacqISP, integrators with a “Shared” host type utilize multitenancy resulting in EM returning an incorrect domain name which causes error 776.
The hostname will default to the name of the server but can be changed if desired
Select Apply
Expected Results
the settings will be saved, and the Dynamic DNS service enabled
Actual Results
An error message will appear similar to the one below
Also notice that the domain name does not match that of the customers Integrator Service Portal instance.
Expected slo003 but EM returned ele062
Solution
This is a result of the Host Type for a given Instance being “Shared” vs “Dedicated”. Customers with a Host Type of “Shared” cannot use the Dynamic DNS feature whereas those with a Host Type of “Dedicated” can. This has to do with multitenancy for shared instances. Currently there is no workaround and new integrators will by default have a shared host type.
This procedure is applicable to replacing the primary hard drive of a Linux-based exacqVision system. It assumes that the operating device is installed to an on-board flash device. Do NOT use this procedure when simply adding a drive to a system.
Run GParted from System, Administration, GParted. Select the empty hard drive from the drop-down list in the top-right corner. Note that the drive is unallocated, which indicates that you have selected the correct hard drive. Select Create Partition Table from the Device menu.
Select gpt from the Select New Partition Table Type drop-down list. Click Apply.
Right-click in the unallocated space and select New to open the Create New Partition window. Select 20000 (or more) in the New Size (MiB) box. Select linux-swap in the File System drop-down list. In the Label field, type swap. Click Add.
Right-click the unallocated space and select New to open the Create New Partition window. Select 10000 (or more) in the New Size (MiB) box. Select ext4 in the File System drop-down list. In the Label field, type /mnt/export. Click Add.
Right-click the unallocated space and select New to open the Create New Partition window. Select the highest available number in the Set New Size (MiB) box. Make sure Free Space Preceding and Free Space Following are both zero. Select ext4 in the File System drop-down list. In the Label field, type /mnt/edvr/1. Click Add.
Click the green checkmark and then click Apply. Wait for the operations to complete.
Open a Terminal window by selecting Applications, Accessories, and then Terminal. Enter the following command:
sudo gedit /etc/fstab
Add the following lines to the end of the fstab file:
In the terminal window, enter the following commands.
sudo /etc/init.d/edvrserver stop sudo udevadm trigger sudo mount -a
To create your export directories and change ownership: Note: in the following commands both “admin” and “user” should be changed to the relevant account names for the machine having issues.
In a Terminal window, enter the following commands: Note: in the following commands both “admin” and “user” should be changed to the relevant account names for the machine having issues.
The expected recording retention time, calculated prior to system selection and purchase, does not match actual/estimated recording time, causing stored footage to expire sooner than expected.
Product
exacqVision Server
Expected Results
Example: The server will be able to store 30 days worth of footage.
Actual Results
Example: The server will not be able to store 30 days worth of footage.
Solution
Firstly, be sure the current camera recording settings and bitrates match those used in your system’s configuration calculations prior to purchasing the system.
Second, compare the maximum bitrate and the current bitrate. If the current bitrate is well below the max bitrate then the issue doesn’t lie with the bitrate/quality settings. If however the current bitrate is constantly hitting the maximum bitrate limit then it is related to this issue.
To resolve this high bitrate issue you can try dropping the bitrate to a lower amount, adjusting the framerate so less images are captured per second. Consider dropping the quality of the footage if applicable and reducing the resolution of the captured footage. This will allow the server to store the required quota of footage.
When using exacqVision Enterprise Manager version 22.03. Some of the information of servers is not shown even if the user has the correct rights. This may also affect creating users.
Product
Enterprise Manager 22.03
Steps to Reproduce
Add Server to EM
Go to Cameras
Expected Results
All cameras are displayed with all information.
Actual Results
Camera name and address are missing.
Solution
This a sync issue with EM and the server please upgrade to 22.06 to resolve this issue.
Plug the USB key into the NVR and restart the machine
On Boot, after the MegaRAID initializes (if applicable) and prior to the operating system loading press the Delete key “Del” to enter BIOS setup
When prompted enter the BIOS password “admin256” and press “Enter”.
On the Main tab check the current BIOS version, listed as UEFI Version
If the version is L3.12E or higher a BIOS update is not required.
To update the BIOS, select the Advance tab, highlight Instant Flash, and Enter.
Instant Flash will automatically detect all devices and only list those BIOS versions which are suitable for your motherboard, select the suitable BIOS version and press ENTER to flash.
The BIOS update should progress
Please DO NOT power off during BIOS update.
After update success completes, press Enter to reboot system
The server will power cycle several times, press [F2] or [Del] to enter the BIOS setup utility.
On the Main tab verify the new version “L3.12E”
Verify the date and time are correct
Press F10 to exit BIOS and restart the machine.
Note:
In the event the BIOS password “admin256” fails after Instant Flash perform the following steps
Power the server off
Turn the individual power supplies off and remove the power cords
Disconnect the CMOS battery
Hold the power button on for a few seconds to discharge any residual power
Reconnect the CMOS battery
Reconnect the power cords and power the unit on
Traditionally systems with MegaRAID controller cards would display initialization information along with the option to enter the MegaRAID BIOS when a system is first booted. After updating the BIOS this will no longer be the case, the MegaRAID BIOS is accessible through BIOS Setup on the Advanced tab. If desired the older behavior can be restored by enabling CSM “Compatibility Support Module” Parameter on the Boot tab.
Microsoft provides customers a choose of Server Core or Server with Desktop Experience. Choosing either Microsoft Windows 2019 or 2022 Server Core results in EM being inoperable when installed.
Product
exacqVision Enterprise Manager
Microsoft Server 2019 Core
Microsoft Server 2022 Core
Steps to Reproduce
Install exacqVision Enterprise Manager on a machine running either Microsoft Windows 2019 or 2022 Server Core
Expected Results
exacqVision Enterprise Manager installs and runs normally
Actual Results
exacqVision Enterprise Manager is inoperable
No errors reported during install
The dashboard is not accessible via a web browser
Further inspection shows the following services are not present
enterprise-importer, enterprise-sendemail and enterprise-datarolloff
Solution
When installing Windows Server, you have the option between Server Core or Server with Desktop Experience. If you intend to run exacqVision Enterprise Manager, you must choose Server with Desktop Experience. This has been confirmed on both Windows Server 2019 and Server 2022 Core installs.
We have observed EM successfully installed and running on Windows Server 2019 Standard with Desktop Experience and If you are looking for a headless server solution, we recommend Ubuntu Server.